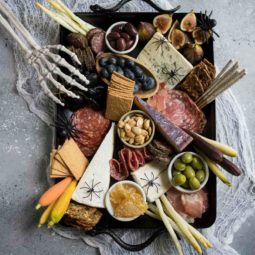
This spooky Halloween charcuterie board is filled with delicious cured meats, cheeses and crackers, as well as some festive seasonal favorites. Gorgeous dark purple figs, goldenberries, peppery and spicy salami make this grazing board perfect for your Halloween party or spooky night at home! My white chocolate Halloween snack mix would be a perfect sweet treat addition as well!
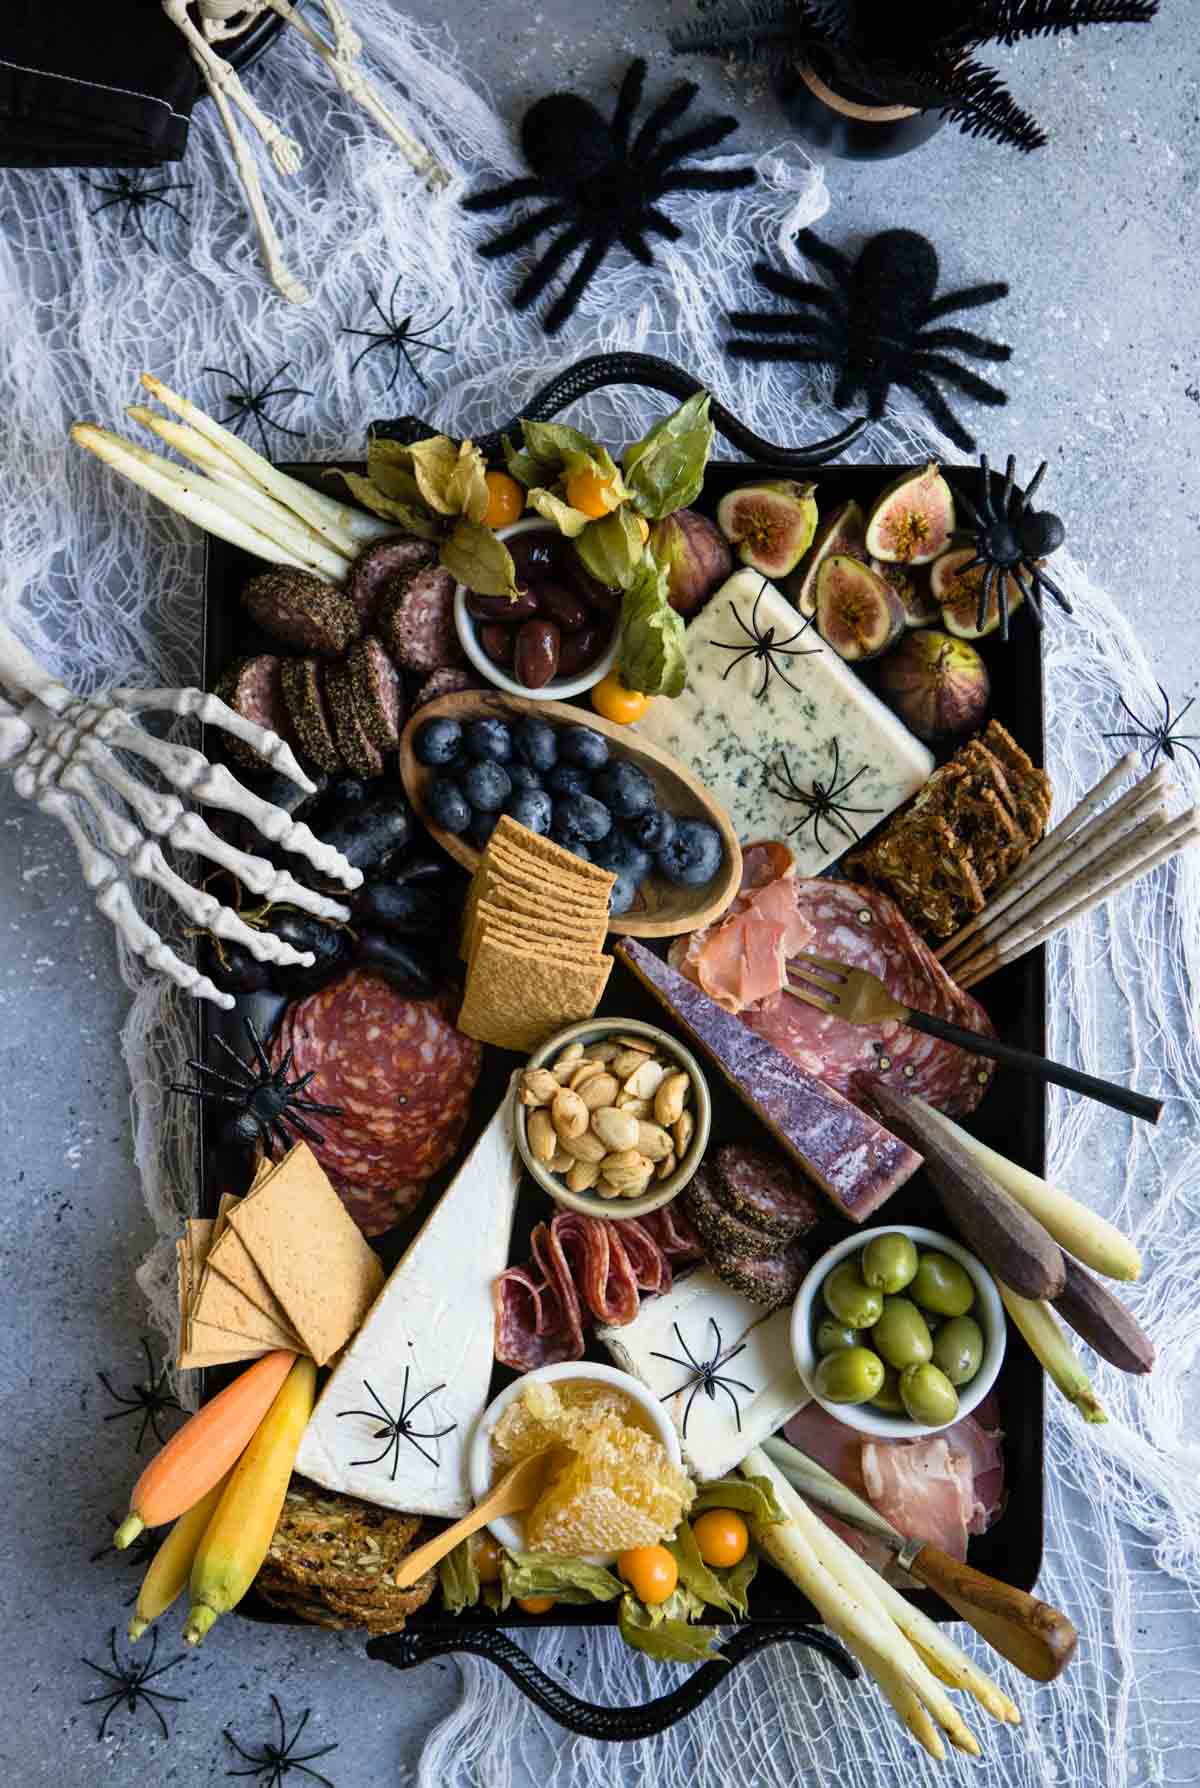
I love this spooky charcuterie board because it is easily customizable so you can include any of your favorites. Snack boards like this are also wonderful because they can be both adult and kid friendly. And I especially love a themed charcuterie board, like this Thanksgiving charcuterie board, or Christmas charcuterie board. Read on to learn how I threw together this spread.
Jump to:
- Why this Halloween cheese board works
- Ingredients for this unique charcuterie board
- Step-by-step guide to assembling this festive Halloween-themed board
- How to choose the right cheeses
- How to add a spooky twist!
- What is charcuterie anyhow?
- Expert tips for assembling a Halloween charcuterie platter without spending a fortune
- Looking For More Halloween Inspiration? Check Out These Posts!
- Halloween Charcuterie Board
Why this Halloween cheese board works
- Highly customizable to whichever cured meats, cheeses and nibbles you’d like to add in, as well as whichever Halloween decorative items you have on hand
- Is family friendly – the best part of this Halloween snack board is there’s a little something for everyone to enjoy
- Impressive presentation to entertain guests or take to a party
- Make it sweet or make it spooky – your Halloween board can take on a more kid-friendly whimsical theme by adding in silly decorative items, or make it dark and creepy for a teen or adult gathering.
- A meal in one – by adding in seasonal fruits and veggies, along with the cheese and meats, this becomes a light meal for nights when you want to feed the family a fun and easy dinner.
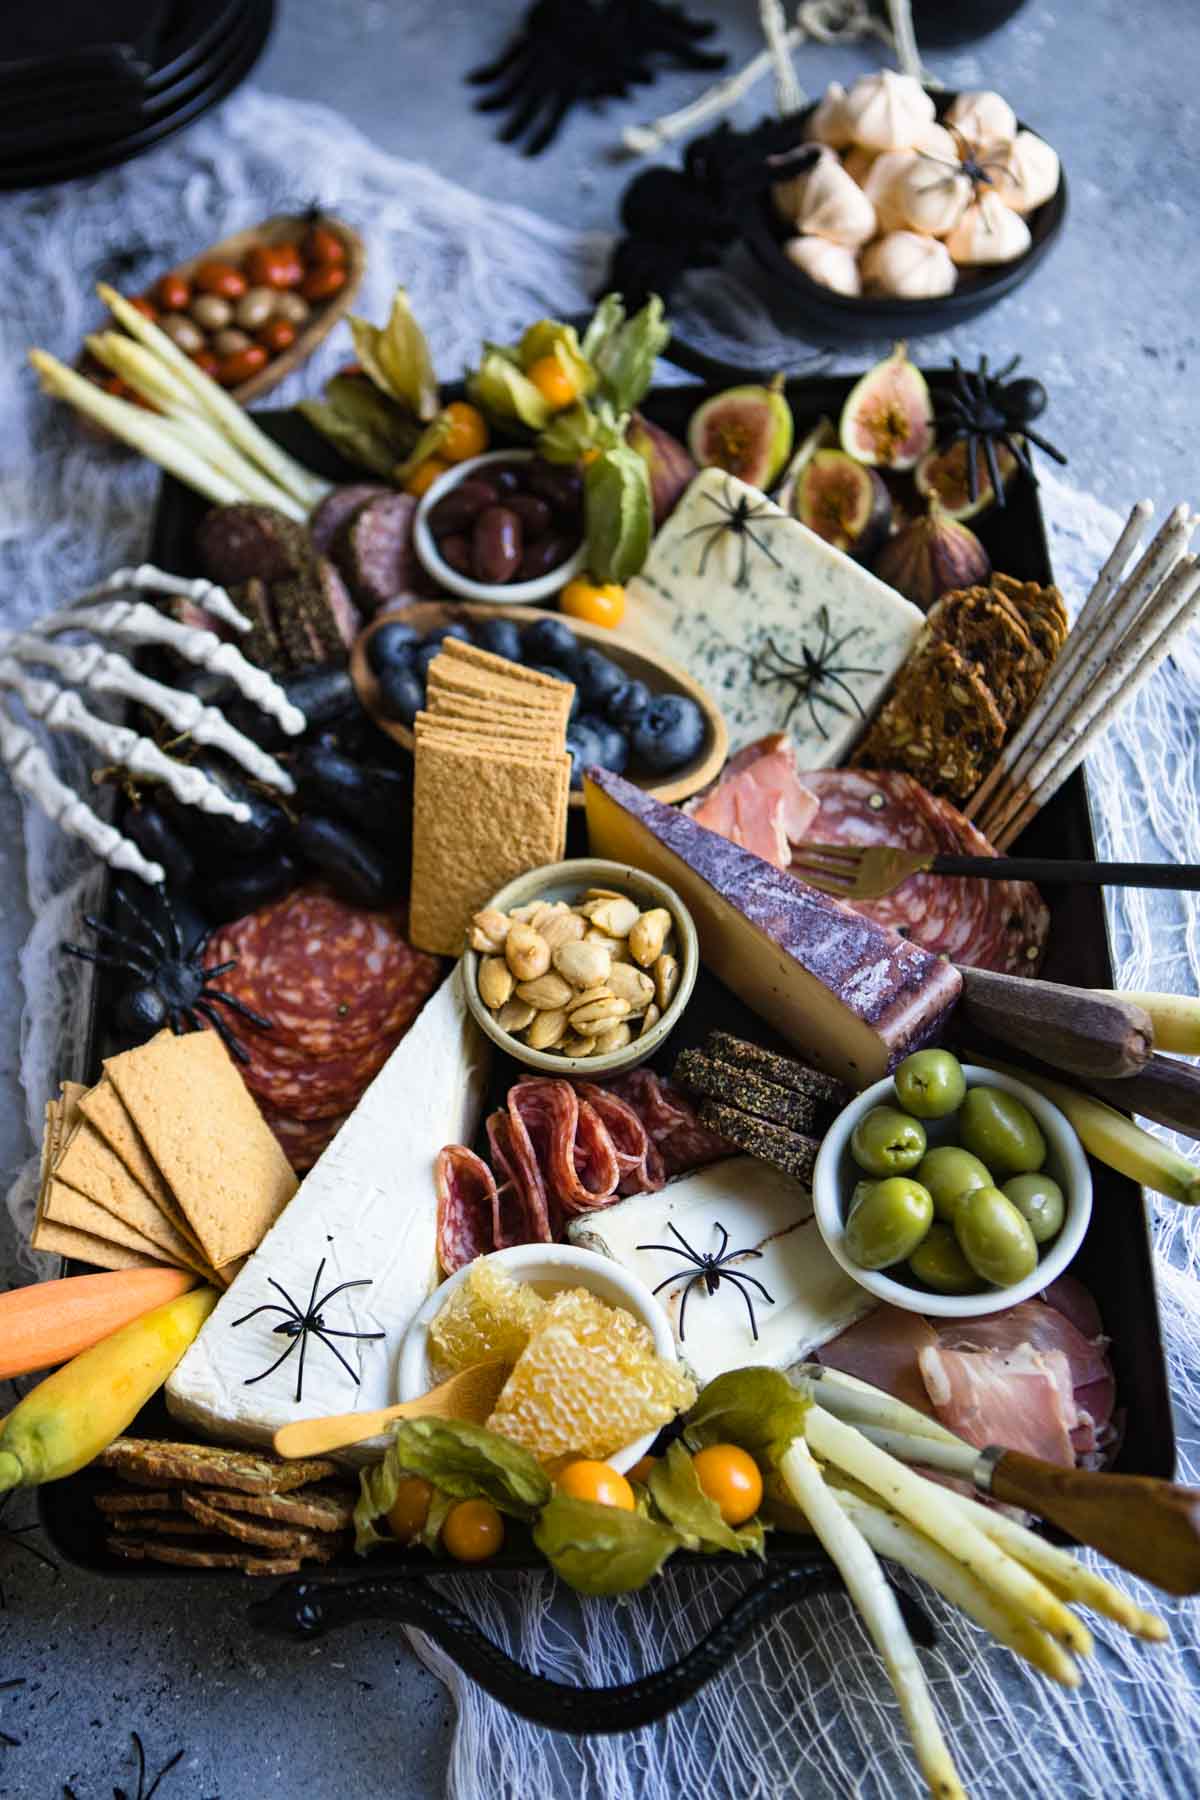
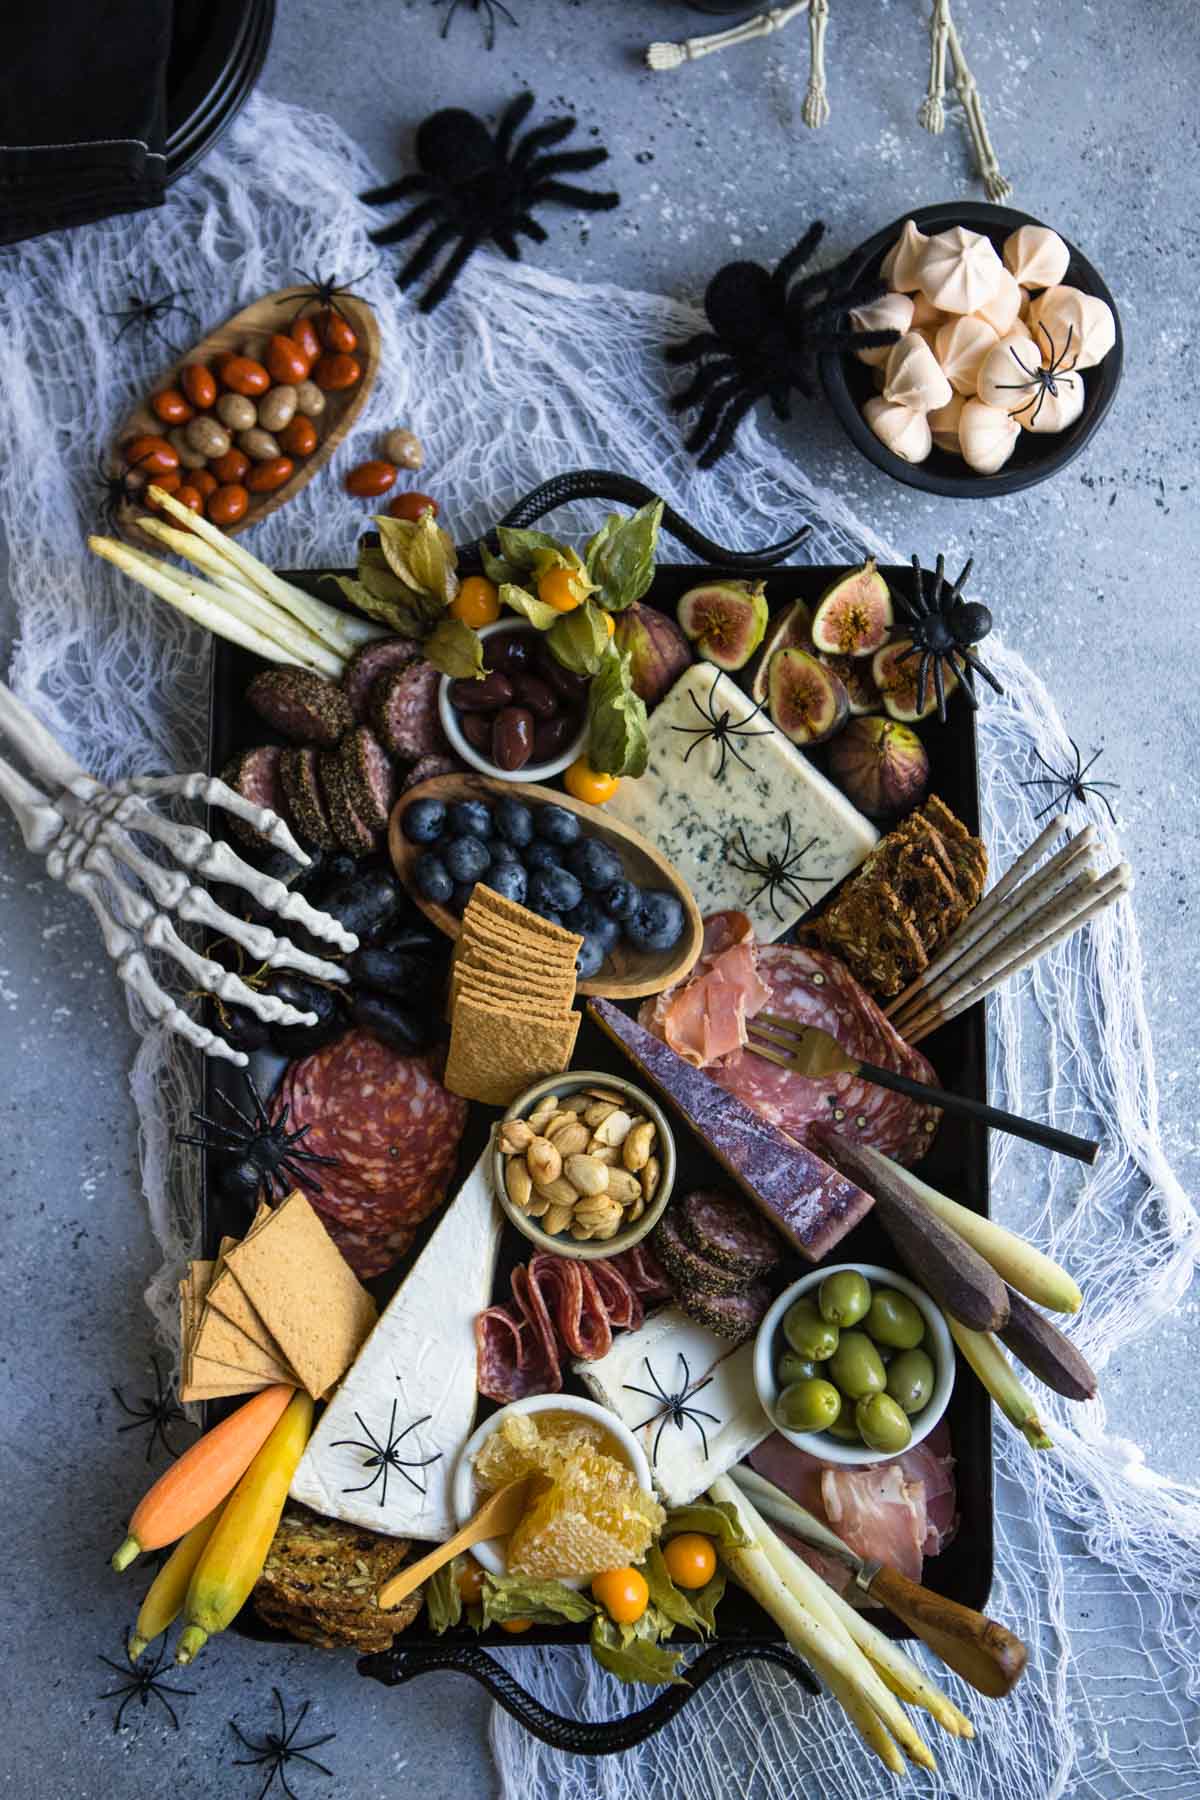
Ingredients for this unique charcuterie board
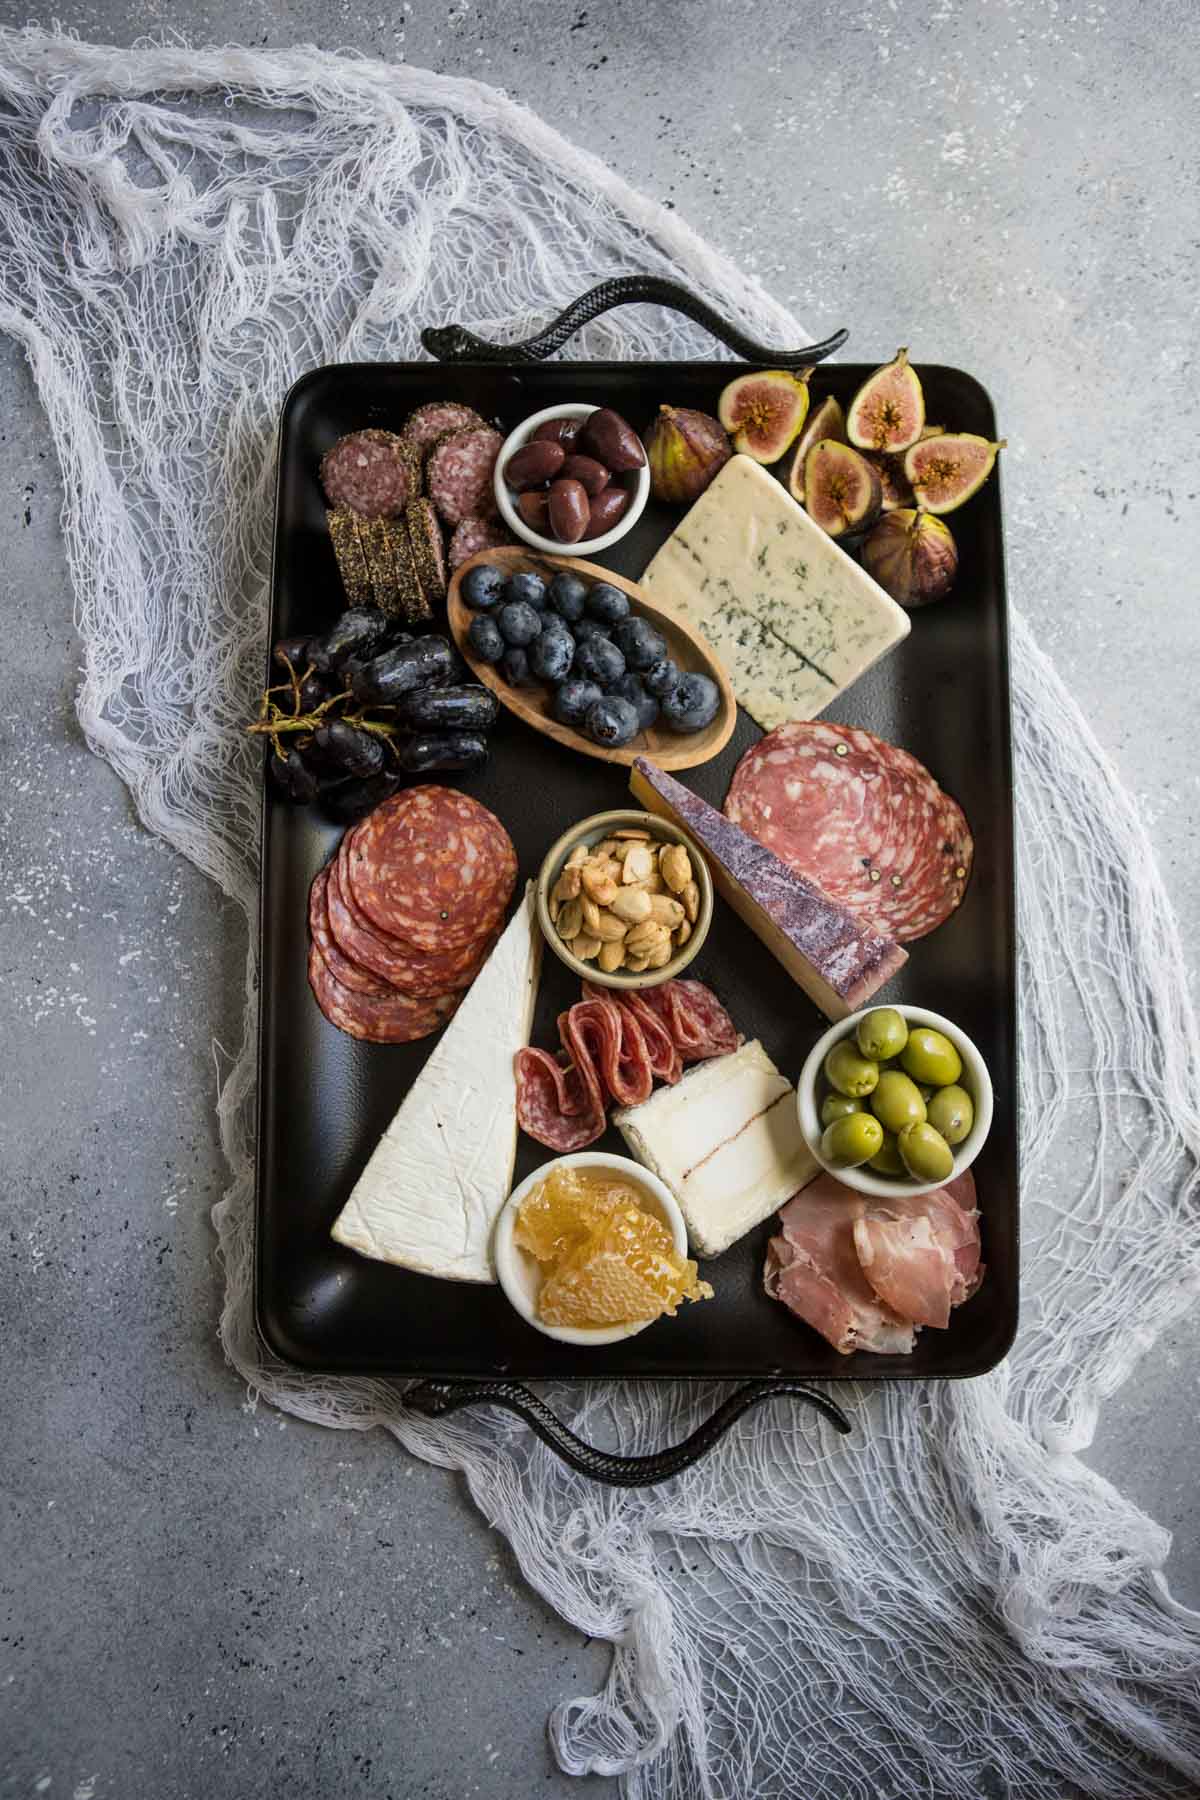
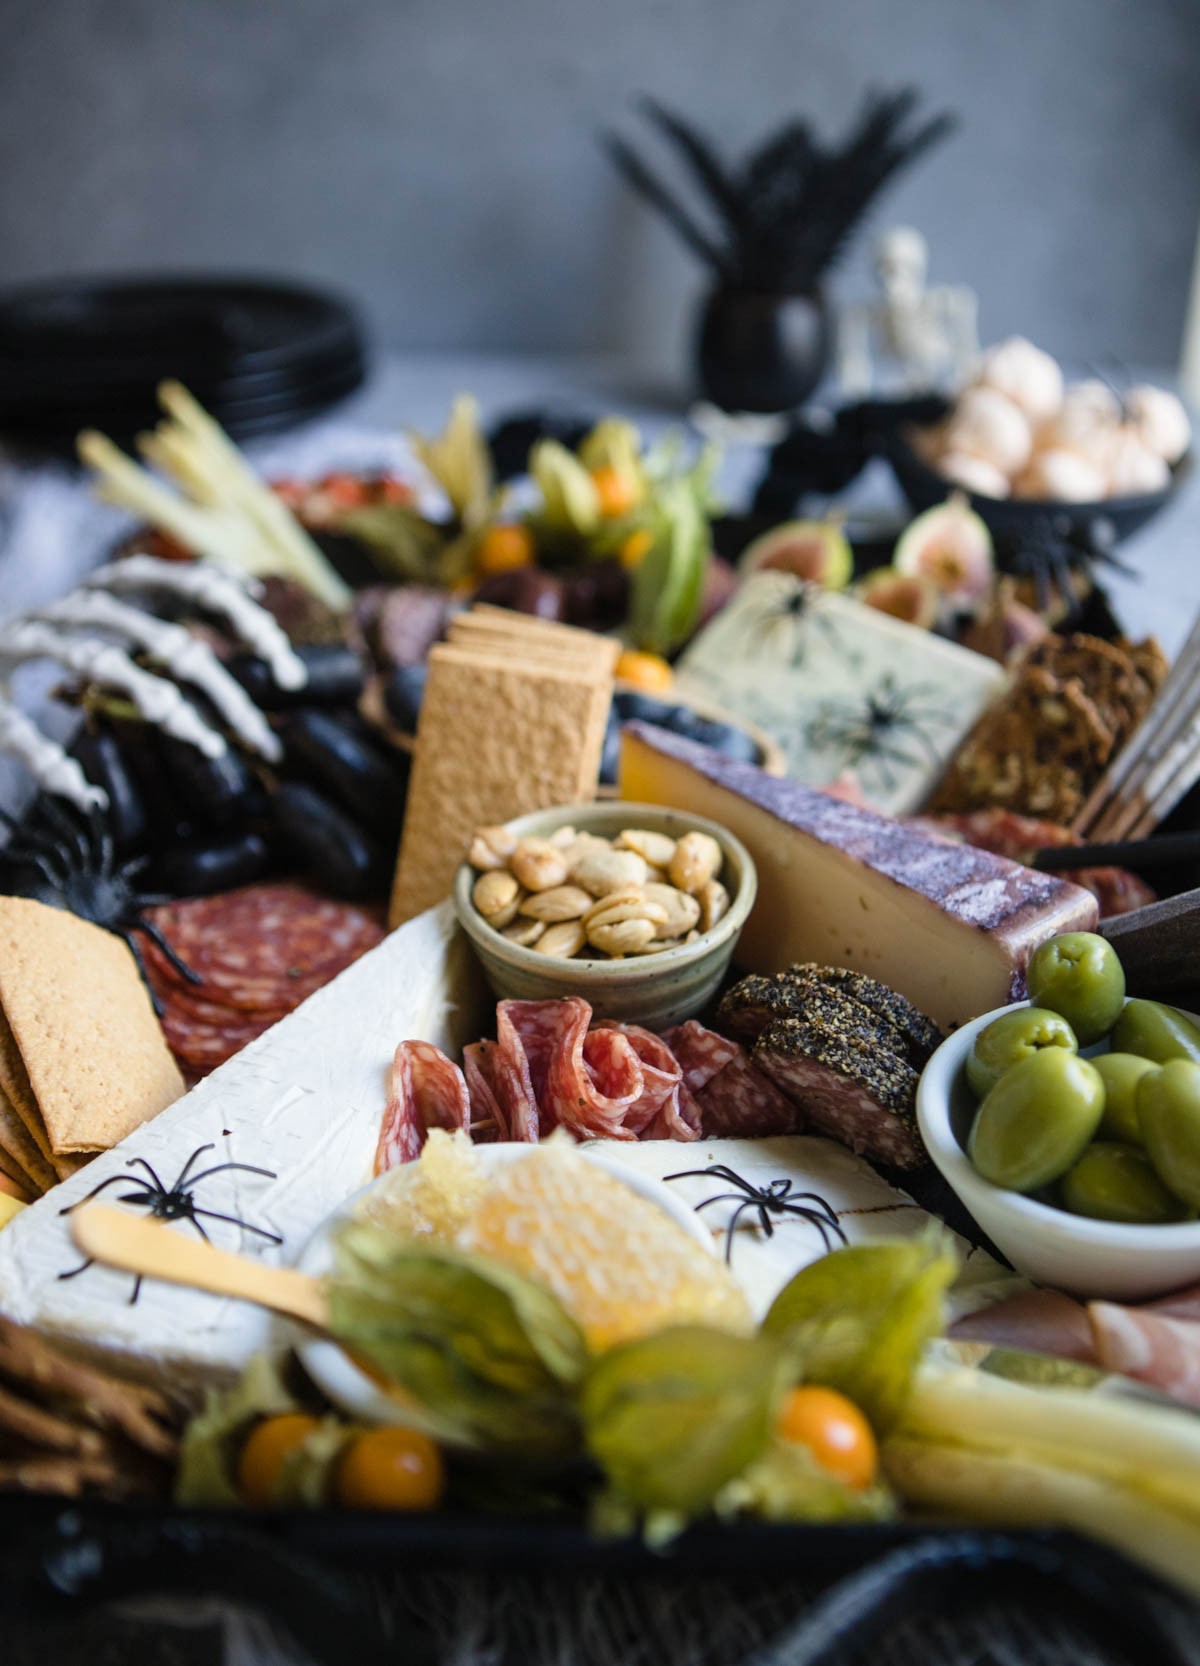
- A variety of cheeses – include both hard cheese and soft cheese options, and to not overwhelm, I typically limit it to 4 choices.
- Cured meats – a hard salami and something delicate like prosciutto are great options
- Finger foods to nibble on – nuts like marcona almonds and a couple of variety of black and green olives are great to add different textures and a bit of acidic flavor
- Fresh or dried fruits and veggies – Grapes, berries, dried mango or cherries, and thinly sliced carrots or asparagus spears are all refreshing options to cleanse the palate
- Crackers – a charcuterie board wouldn’t be complete without a couple of cracker options. I like to choose a hard and sturdy cracker to spread cheese on, as well as a light cracker to just nibble on
- Sweet treats – think candy corn, candy pumpkins, chocolate covered almonds, chocolate candy eyeballs or other fun sweet treats for guests to satisfy their sweet tooth
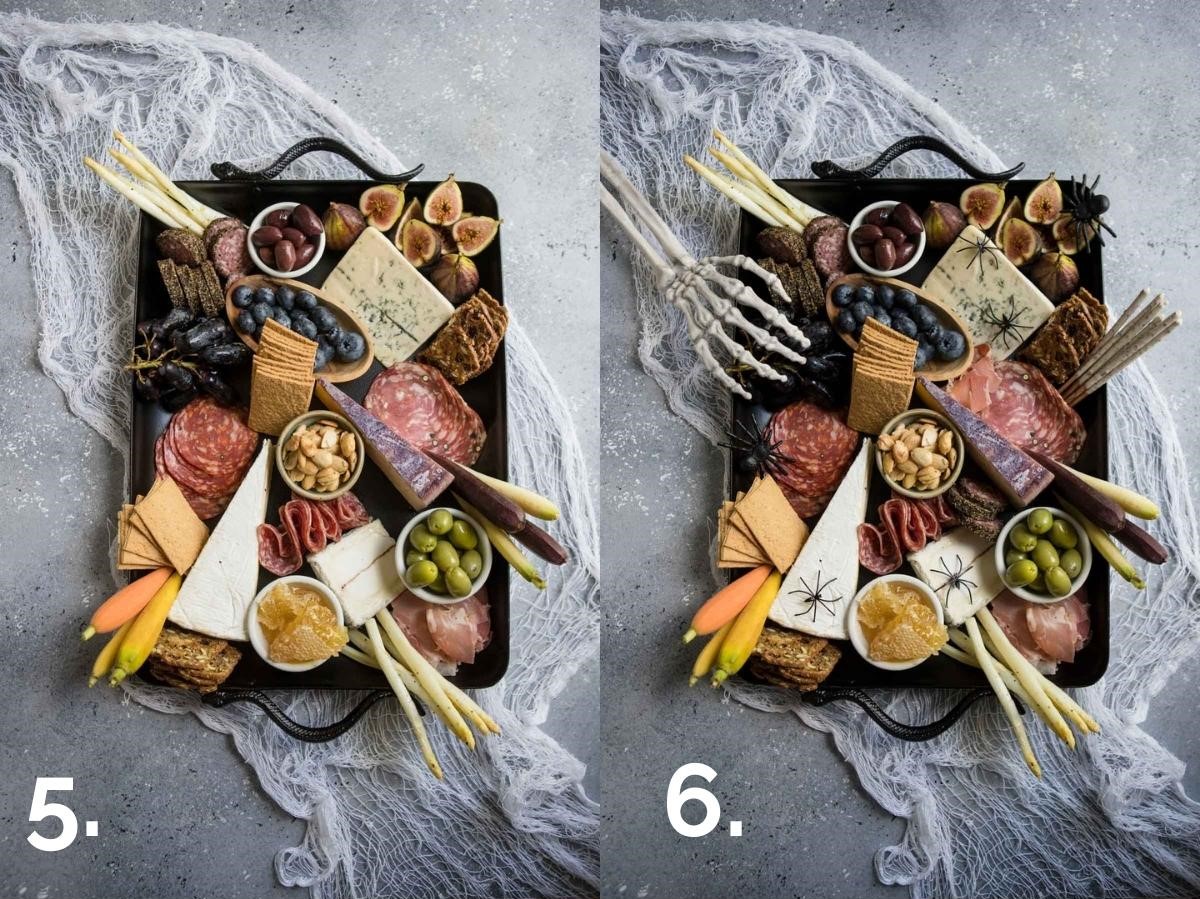
Step-by-step guide to assembling this festive Halloween-themed board
Choose your serving platters and utensils – for this board I chose a black snake board I picked up at Target, perfect for spooky season! Then I chose a few small bowls to hold nibbles, as well as a cheese knife for soft and hard cheeses, and cocktail forks. A large cutting board makes a great serving tray for a charcuterie platter.
Assemble your cheeses – I always begin by setting down the cheeses first, as everything will work off of that
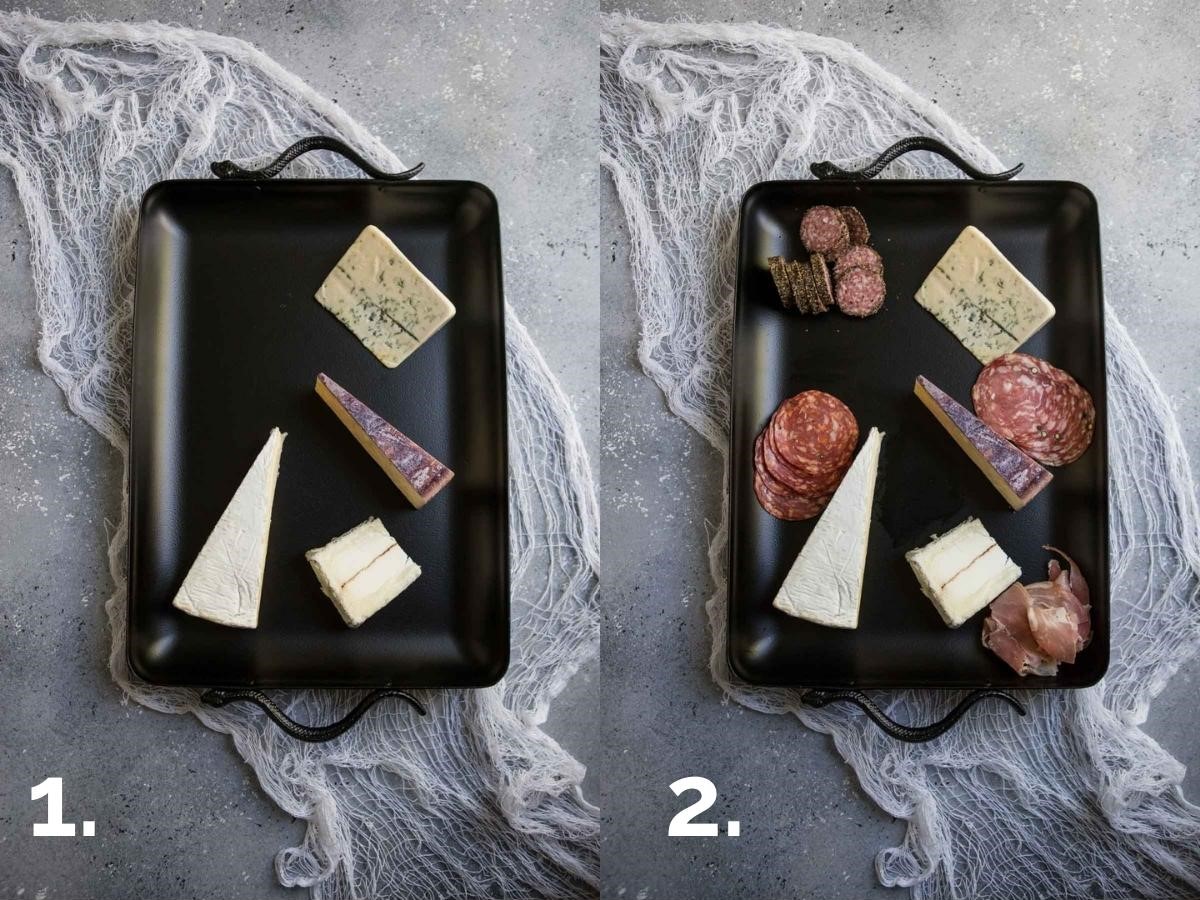
Now place the cured meats – When placing them on the board, I start by putting out several slices of each, but then add in more at the end to fill in empty spots, so make sure you only put out about ⅔ of each type of meat, and set aside the remaining pieces to fill in gaps as needed.
Fill in with olives, nuts and fruits – For a fun Halloween twist, choose purple and blue fruits (think blueberries, purple figs or pomegranate seeds) and black olives for a dark spooky feel.
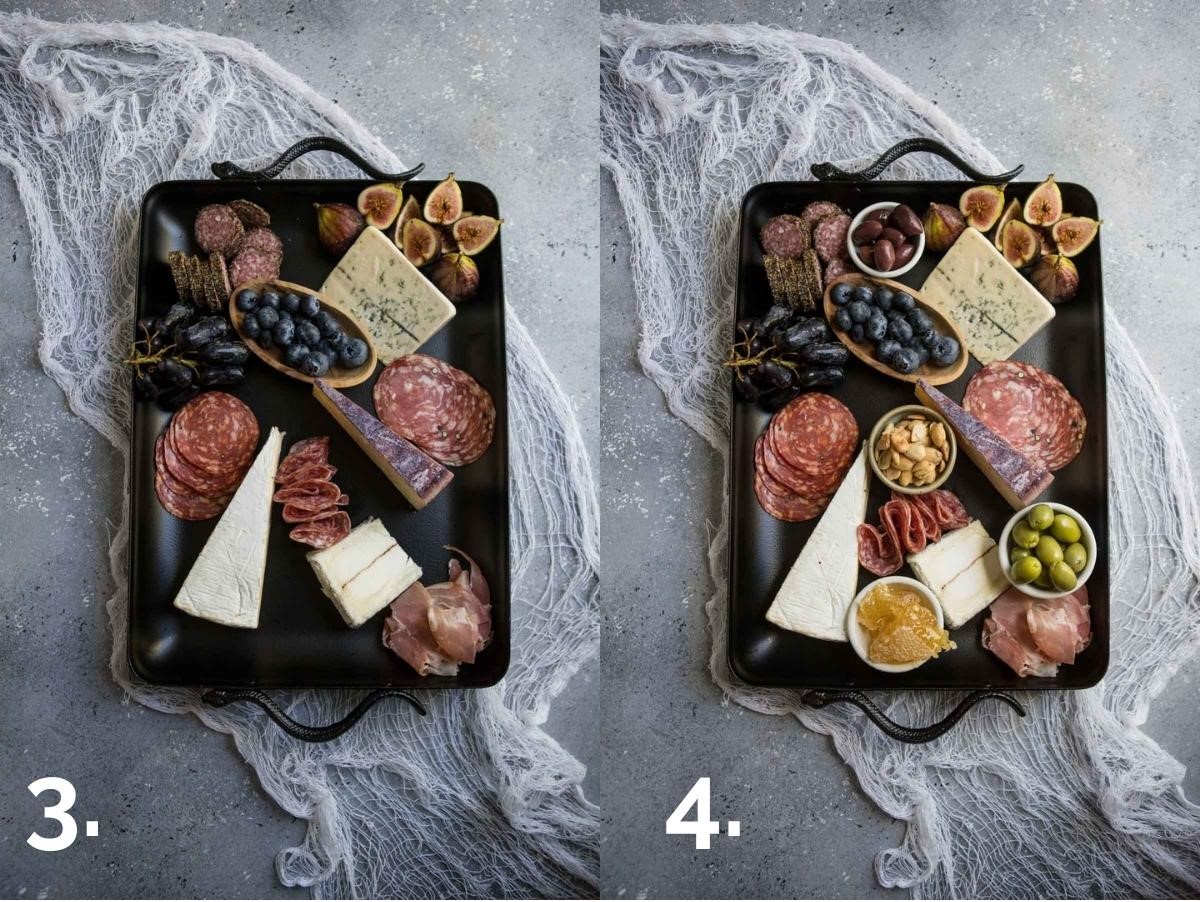
Add the crackers last (to keep them fresh!) – Placing the crackers is one of the last ingredients I place because I want them to stay as crisp and fresh as possible.
Finishing touches – If you want a really full looking board that looks like it’s exploding with food, fill in little gaps. This is also when you’ll add in your Halloween decorative items
How to choose the right cheeses
Pro Tip: When selecting cheese for a charcuterie board, I like to have an assortment of cheeses including hard, soft and a crumbly cheese like blue cheese or gorgonzola.
I included a merlot skin asiago which is a hard and nutty cheese that tastes great all on its own. I usually pick up a small piece of Humboldt fog, which is a goat cheese with a characteristic pungent blue streak and a creamy but slightly bold flavor. A wedge of brie is of course is always a great addition to any classic cheese board. And a Irish cheddar is great for kids and adults to enjoy.
How to add a spooky twist!
A fun ideas to add a creepy vibe is by adding spooky decor like plastic spiders, skulls and skeleton hands set on top of ingredients. Layering in muslin or other apropos Halloween-esque fabrics also work well to layer texture and add to the spooky vibe.
You can also add in a ghoulish treat or two like gummy worms. candy eyes or other fun Halloween foods in pumpkin shapes. Now that Hocus Pocus 2 was just released, it would be really fun to make a movie-themed board. I love shopping Trader Joe or whatever I can find just my local grocery store.
What is charcuterie anyhow?
The actual term charcuterie means “cold cooked meats collectively.” A classic charcuterie board always has an assemblage of cured meat products, cheeses, nuts and crackers, and more elaborate boards may also contain pickles, olives and sweets. I actually show you here how to make a perfect cheese charcuterie board, but I loved sharing with you how to make a board for Halloween season.

Expert tips for assembling a Halloween charcuterie platter without spending a fortune
- A Well Stocked Pantry: Keep your pantry stocked with non-perishables that make for fun ingredients when you find them on sale. Fancy crackers, nuts, jarred olives and little sweet treats can be picked up and stored for your next occasion.
- Check Home Goods: Home Goods is a great place to stock up on unique snack items, especially jars of beautiful olives, chocolates and crackers, and are priced really well. Occasionally you may even find honeycomb!
- Check Trader Joes: Trader Joe’s has fantastic prices on cheese and seasonal non-perishable snack items.
- Get Your Meats From The Deli: Buy cured meats from the deli counter, as the prices are usually cheaper by the pound, and you can more easily stick to a specific budget by only buying what you need.
- Buy Seasonal: Buy seasonally appropriate fruits, as in-season fruit will usually be a lot cheaper.
- Quality Over Quantity: In my book, it’s quality over quantity when it comes to serving nuts. I stick with Marcona almonds and just serve those instead of trying to offer a few different varieties, as it cuts down on costs (nuts are expensive), and pretty much no one can resist them. IMHO, they are the greatest nut of all time so why mess with any others? 😉
I hope you found some fun inspiration in this post, and with just a little planning, will go out and assemble your next charcuterie board like a boss. Gathering ingredients is the fun part, so enjoy the process and don’t get stressed out trying to choose the perfect cheese or waste money buying the fanciest cured meats. Your guests will love and appreciate the effort no matter what the costs involved or how exotic the ingredients.
Looking For More Halloween Inspiration? Check Out These Posts!
Round out this Halloween Charcuterie board with one of these Halloween and Fall inspired post ideas!
- Chocolate Hand Pies for Halloween
- Our Simple Fall Decor
- Apple Cider Moscow Mules
- Royal Icing Halloween Spider Web Cookies
Happy Halloween!
Halloween Charcuterie Board
Ingredients
- 1 lb Cured meats
- 1 lb Assorted Cheeses
- 16 ounces Assorted Crackers
- 8 ounces Assorted Olives and Nuts
- 8 ounces Assorted fruits fresh and dried
- 8 ounces Assorted veggies optional
Instructions
- Choose Your Serving Platters And Utensils
- Assemble Your Cheeses
- Then Your Meats
- Fill In With Olives, Nuts, And Fruit
- Last The Crackers (To Keep Them Crisp!)
- Finishing Touches – A few veggies maybe? Or a little more meat in places.
Nicole Washington says
This looks great! I think your selection is pefect for Halloween
Tammy says
What a gorgeous snack board! Love the seasonal theme…perfect for upcoming holidays. I could make of meal of this with a glass of wine. Perfect!
Veronika says
Ha-ha! That’s a fun idea to make a spooky cheese board for Halloween! Definitely need to make it this year!
Marisa F. Stewart says
How Cute! And thank you for adding the true meaning of charcuterie – I’ve seen it as a dessert board and just about everything else. I love the meats and cheeses you use. Frankly I’d rather munch on all those goodies than eat a meal. It’s a nice inspiration.
Uma Srinivas says
Looks fun and creative halloween themed snack! I bet this will be huge hit at the Halloween themed parties.
Marta says
I need ZERO occasion to make a charcuterie board, but if I did, this would be my go-to. I love the added decor, too.
Eva says
This is beautifully put tgether and the skeleton hand and the little spiders are so cool! Perfectly themed for the occasion, indeed. I enjoyed reading about your selection of cheeses and you got me curious about the Humboldt fog! Not something I can ever get here in Sweden, I’m afraid, but definitely one I’d enjoy from your description. Who knows, maybe one day I’ll get to taste it.
Candice says
How fun! Exactly what I was looking for… this Halloween board is going to be the star of the show this year. Thanks for the great ideas!
Shelley says
This is such a super-fun idea for Halloween, and you’ve got so, so many helpful tips on putting together an absolutely perfect charcuterie board (that I can use, any time of year)! Charcuterie boards are so incredibly popular right now, but it actually takes some good planning to make it fantastic while looking carefree and easy-peasy. This post was so helpful and informative for that – thank you!
Alyssa says
This looks absolutely delicious, and so fun for Halloween. I am obsessed with charcuterie boards – so many possibilities, and I love to “graze” at a party rather than eating a heartier meal.
Emily Bruno says
Making this for a Halloween party this weekend- thanks for the inspo!
Anna Kate Goshko says
This is so great! I love the theme!!!
Lauren says
Charcuterie board goals!!! Pinning to my Halloween party board!
Lauren Grant | Zestful Kitchen says
Love, love, love this idea! It’s so festive for Halloween AND beautiful!
Susie says
I absolutely LOVE this idea! How fun! I will definitely be putting together a Halloween Charcuterie this year.