
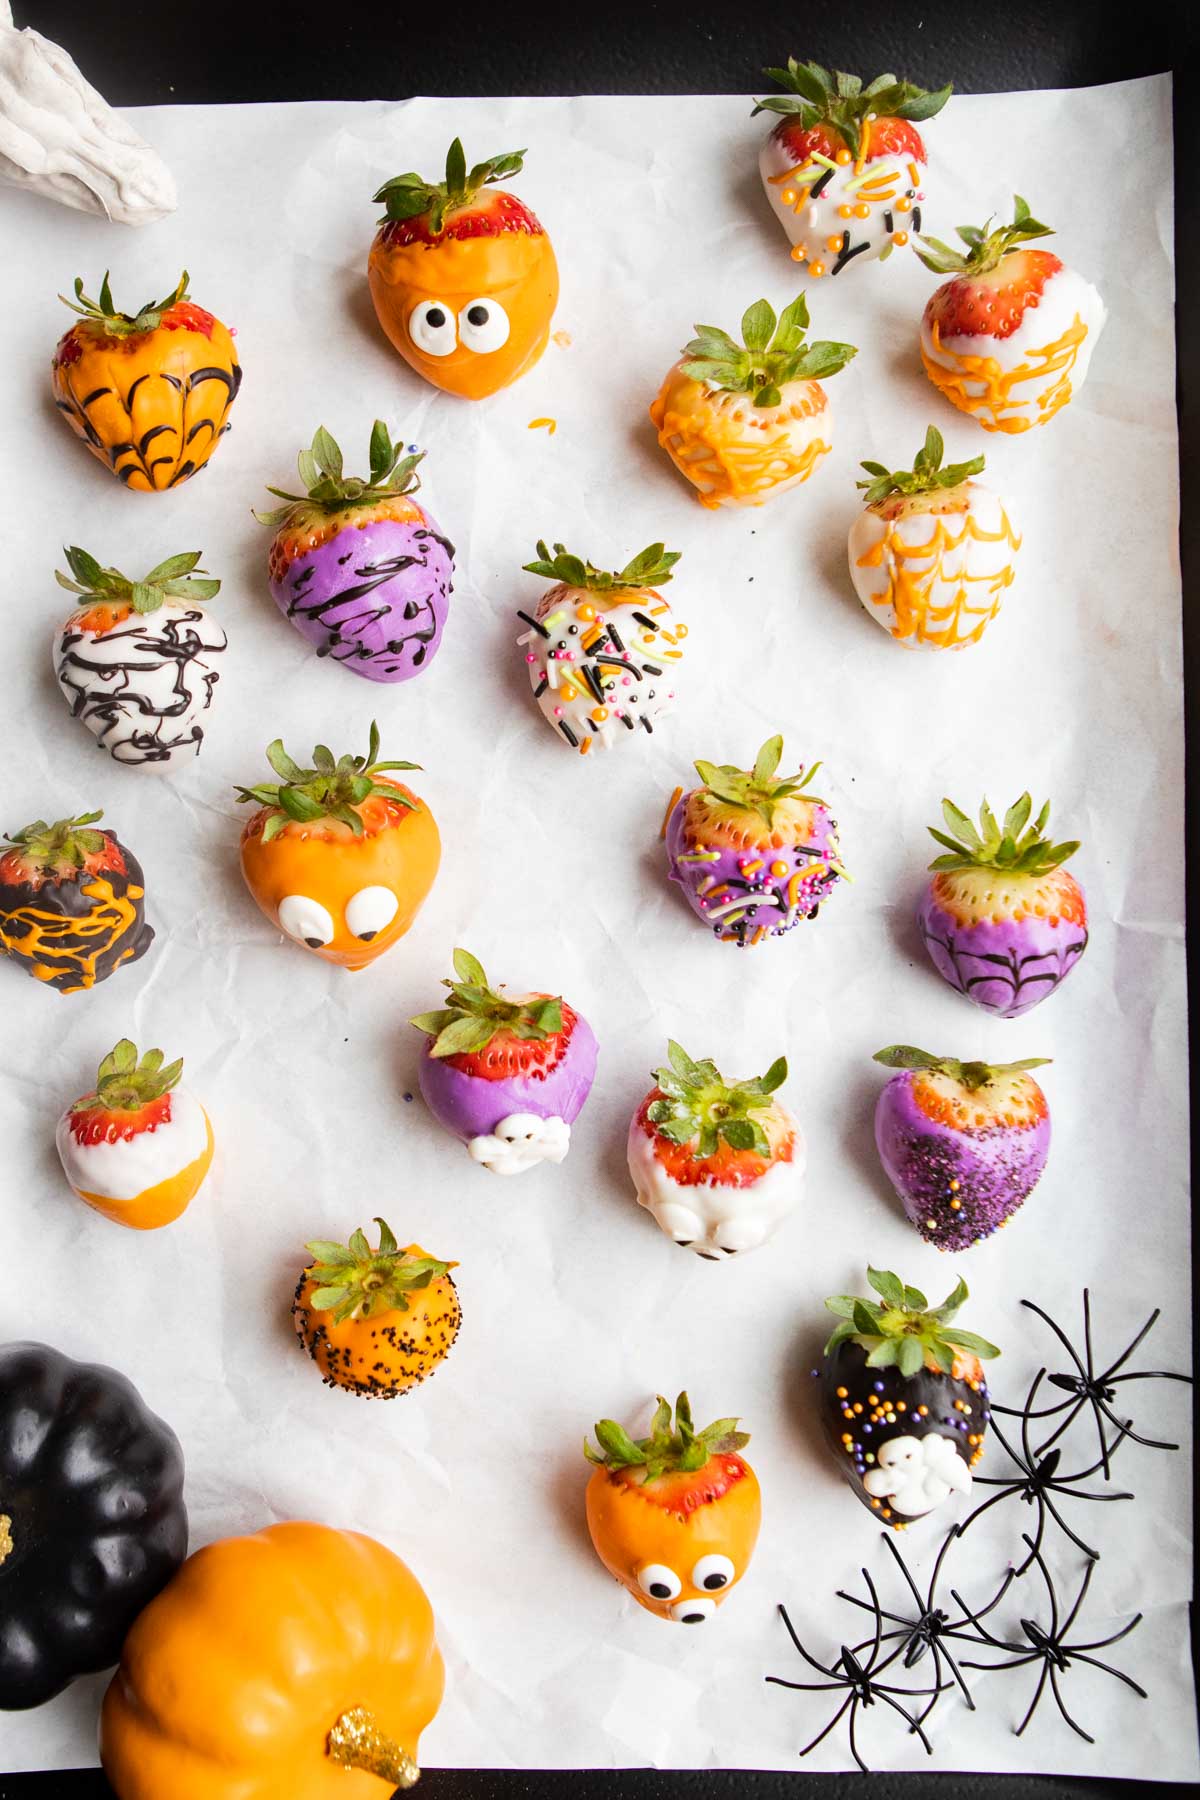
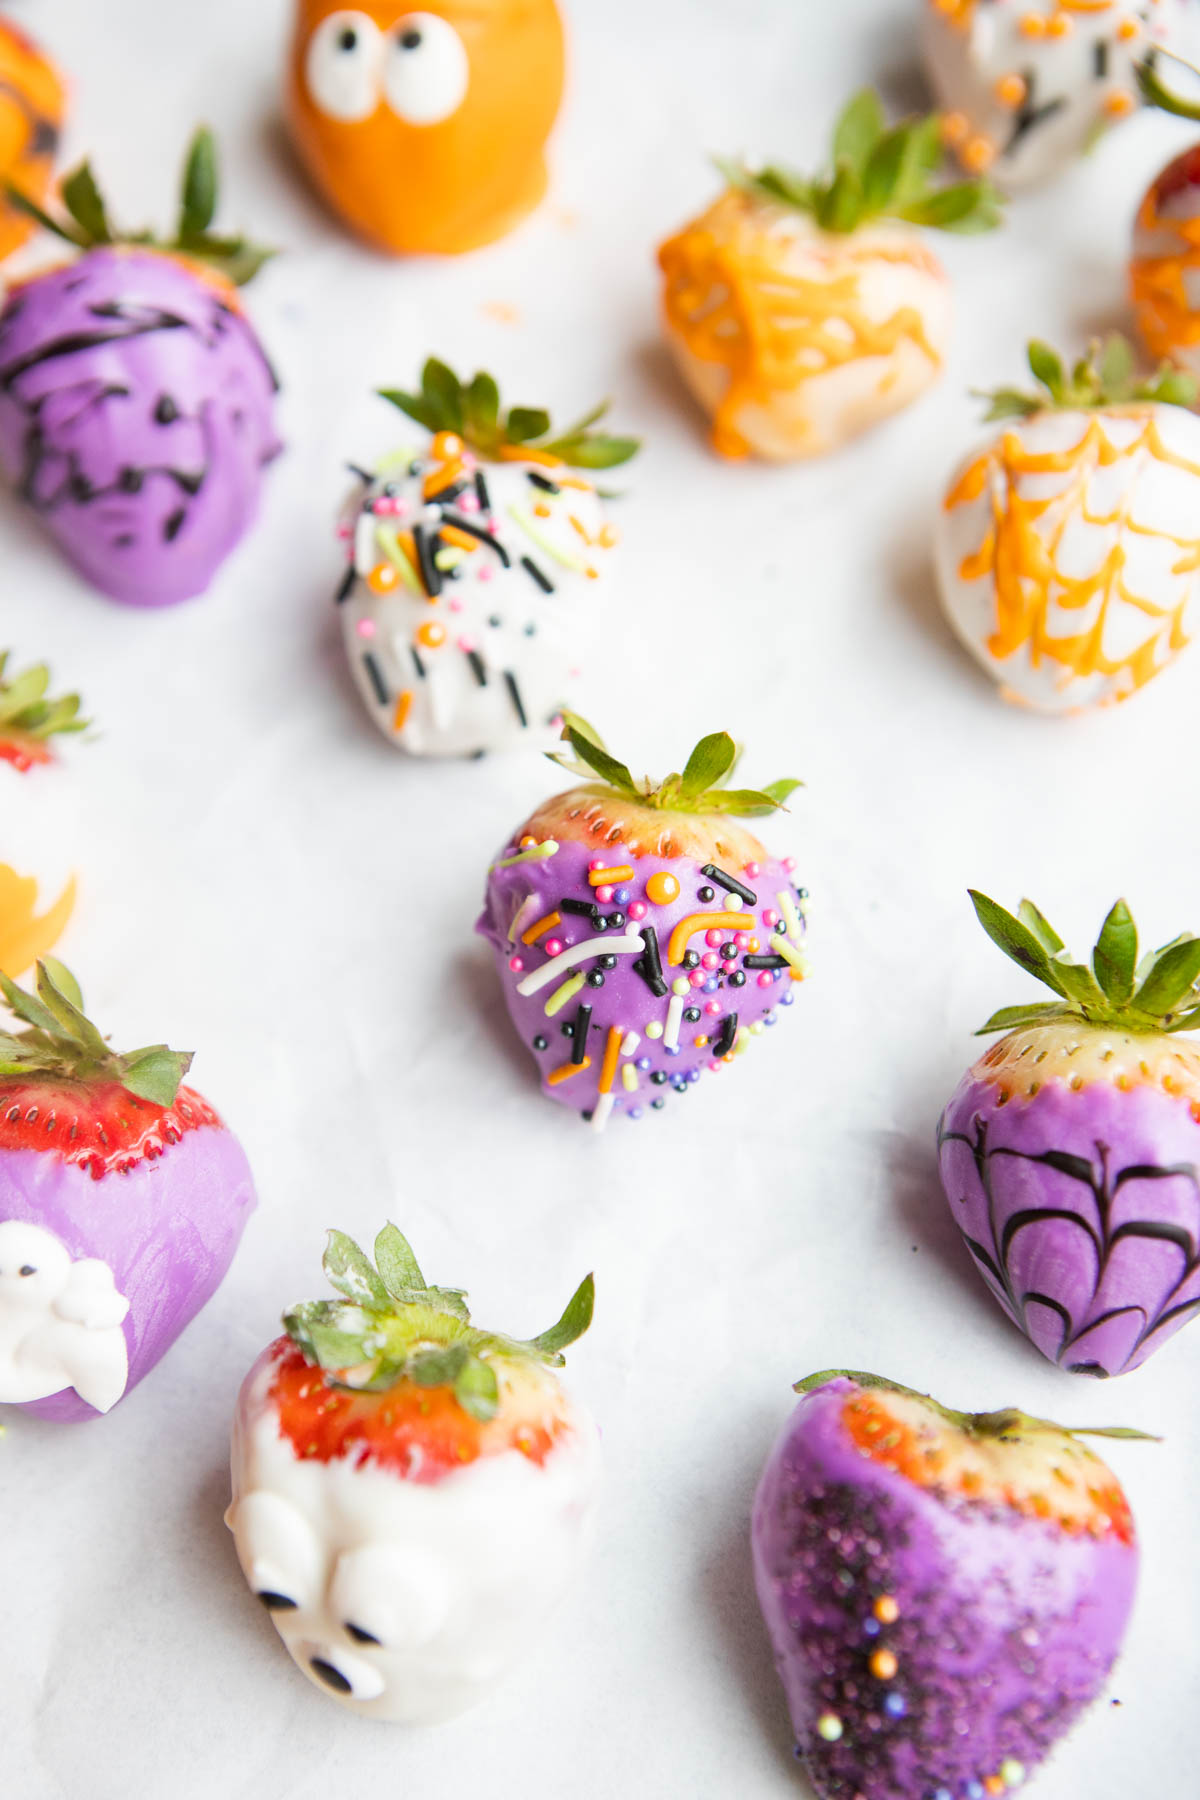
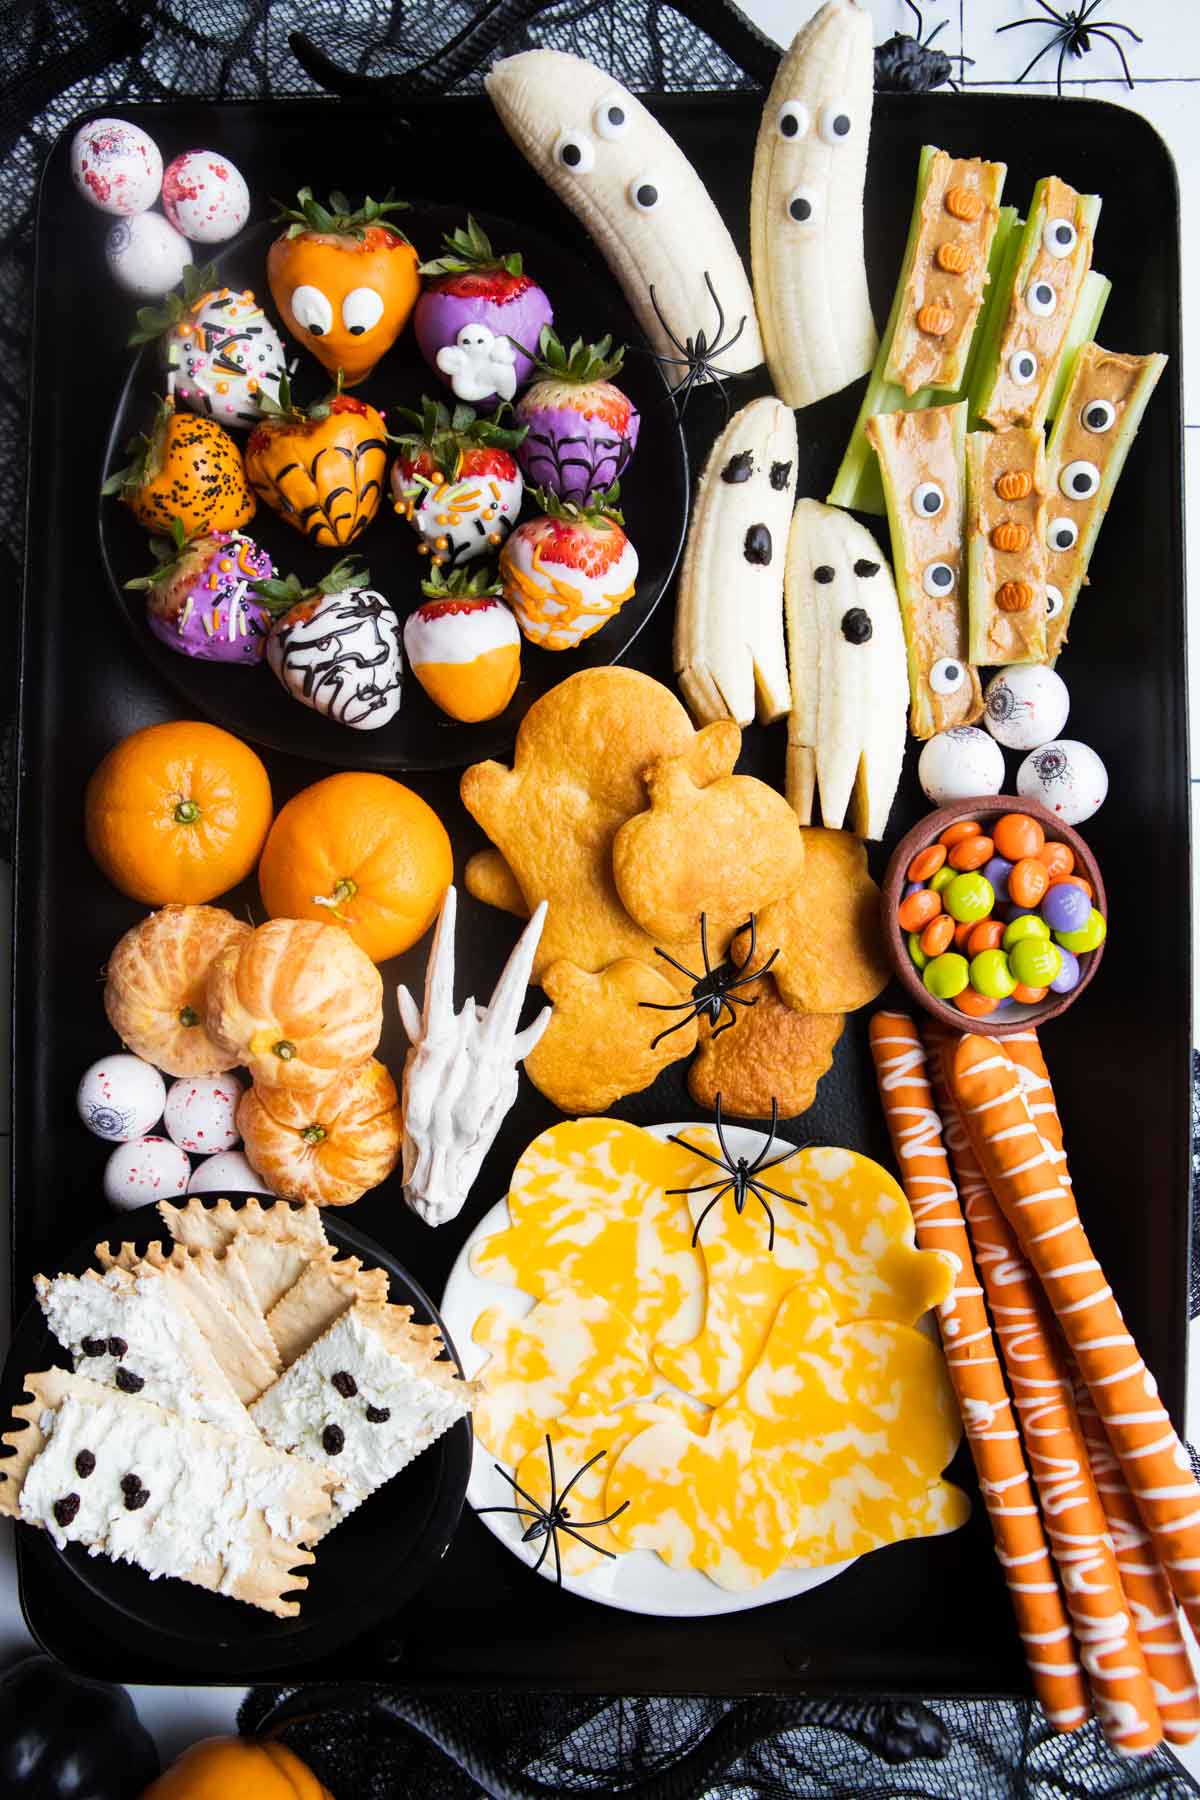
These Halloween chocolate covered strawberries are a huge hit with the kids and are easy to make! Have fun with colors, designs, sprinkles and edible decorations. They’re the perfect accompaniment to my Halloween Charcuterie Board or this after-school Halloween snack board.
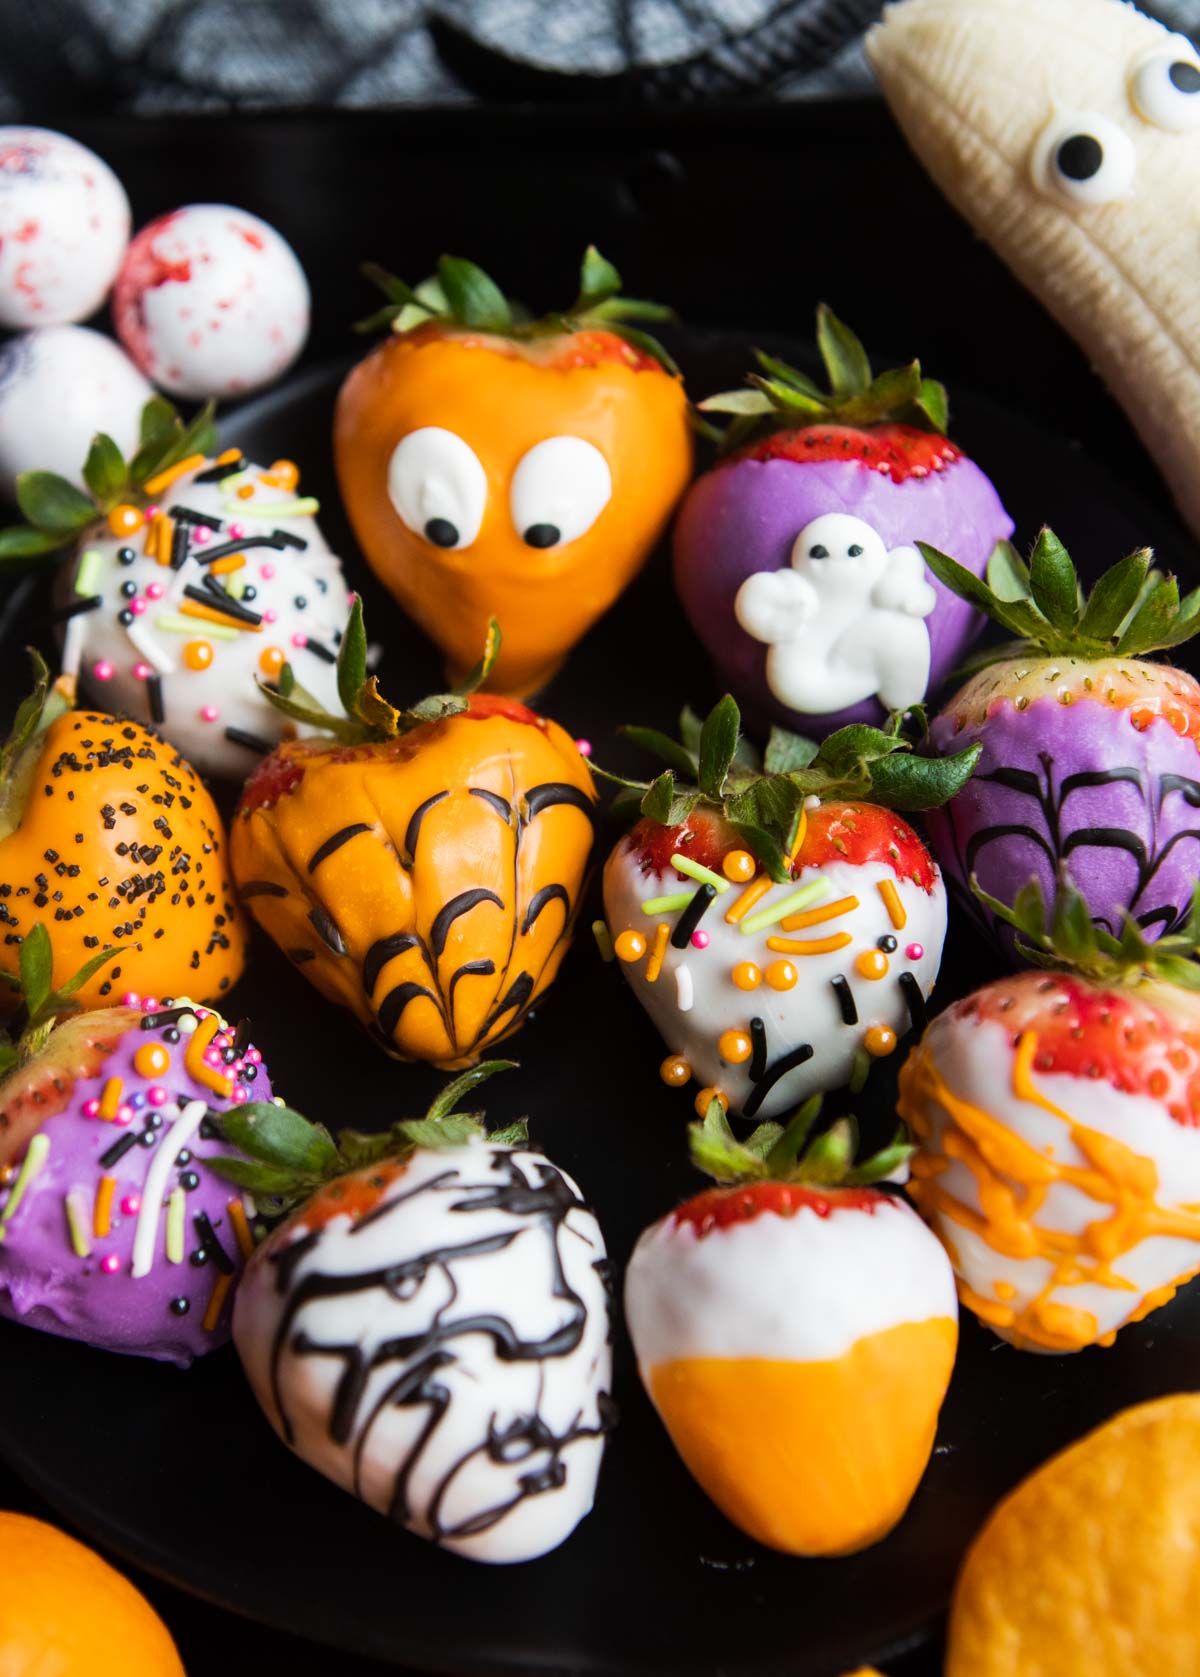
Our family absolutely loves celebrating Halloween all month long. From spooky Halloween decorations, to making Halloween sugar cookies and chocolate mummy hand pies, I will take any opportunity I can to be festive. I’ve never made chocolate-covered strawberries, so I wanted to give it a try. And I discovered they’re not at all hard to make and I loved getting really creative! It was like edible craft time and I’m excited to show you how to make your own easy Halloween strawberries.
Jump to:
Why I love these fun treats
- Be as creative as you want! Once you start making these, it’s hard to stick to the same pattern, design and color theme because there are just so many fun ways to be creative!
- Easy to recreate. If you don’t want to try your hand at making designs, you can simply toss some sprinkles on them, or test your decorating limits by making faces, and fancy patterns. Sky is the limit!
- Tastes delicious! These are not safe around anyone, as no one can resist them! They are sure to be a hit with kids and adults.
- Semi-healthy! Okay, so they may be more chocolate than anything, but at least you’ll get a few vitamins and nutrients with the strawberries. As far as Halloween candy goes, they could definitely be much worse ha!
Gather your ingredients
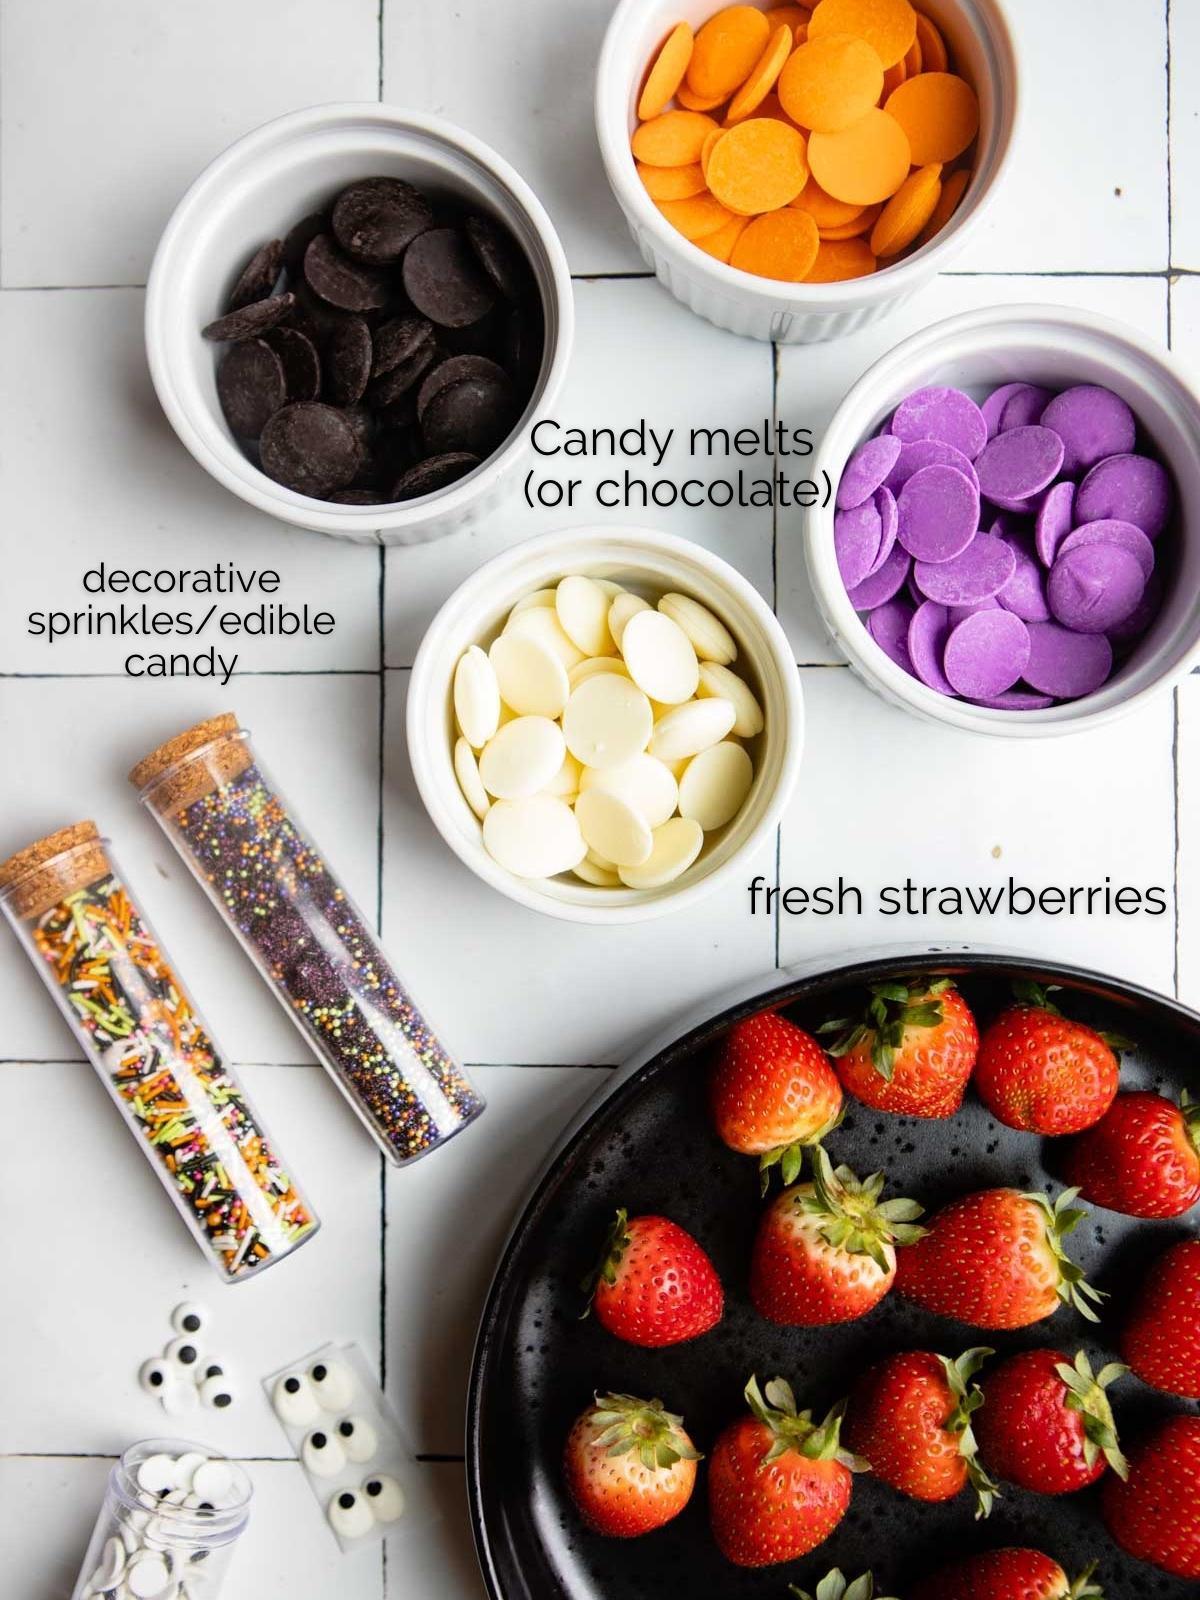
Making these Halloween chocolate covered strawberries only requires a few simple ingredients:
- Fresh strawberries – rinsed clean and patted dry with a paper towel
- A mix of white chocolate and dark chocolate or semisweet chocolate chips, as well as food coloring. OR, you can use colored candy melts if you don’t want to tint your melted chocolate. I used 4 colors including purple and orange candy melts, and black and white candy melts.
- A variety of decorations such as seasonal sprinkles, and edible candy eyes (found at most markets year round, and even Target).
Step-by-step directions
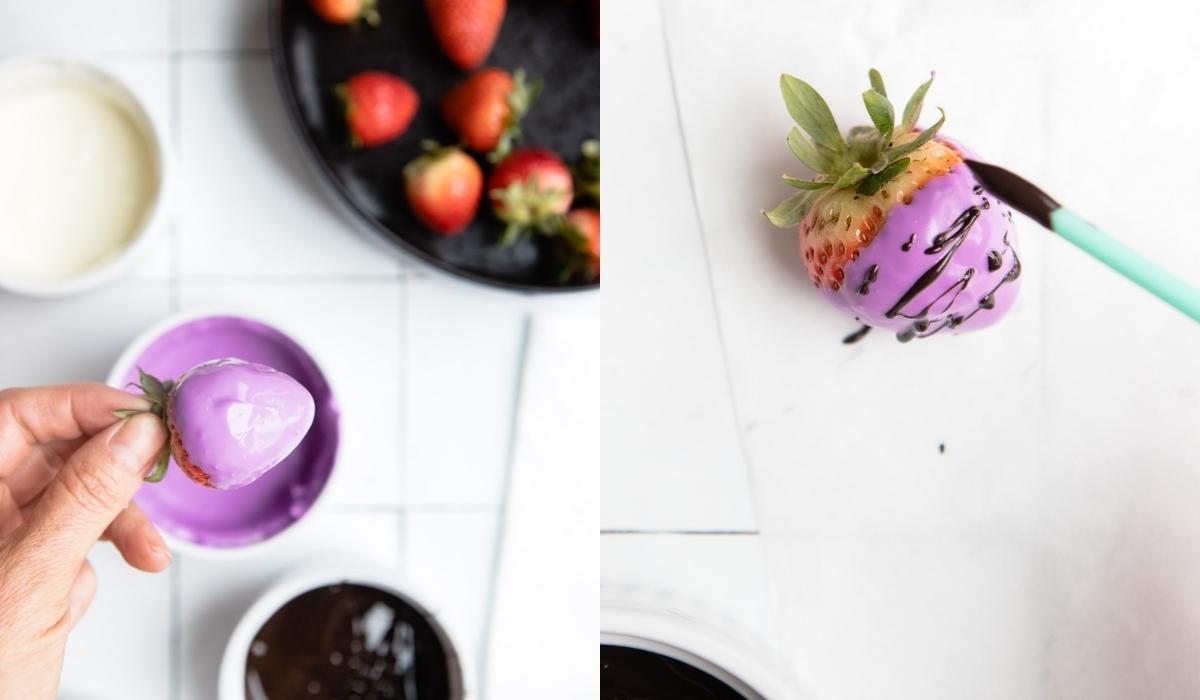
Begin by melting your chocolate over a double boiler till nice and smooth. Add regular food coloring to melted white chocolate if creating different color variations.
Hold strawberry by green tops and dip in melted chocolate, slowly rotating and dipping them as close to the top of the strawberry as possible.
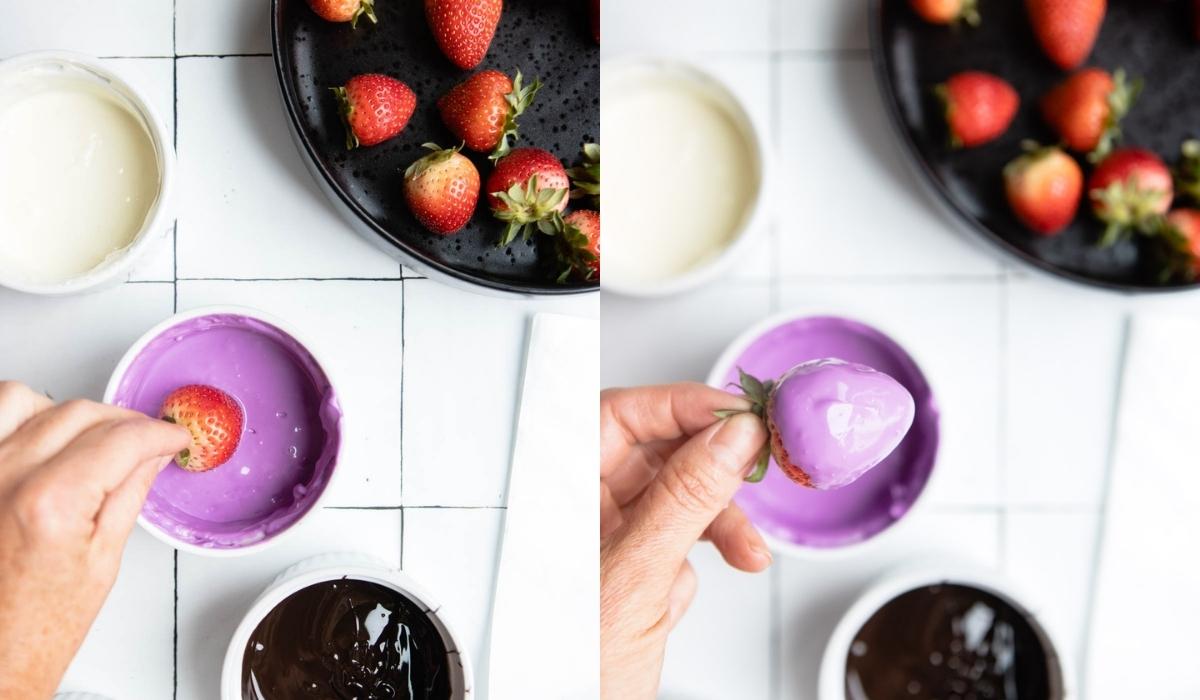
Allow excess chocolate to drip off of strawberry, and immediately set on a baking tray lined with a piece of parchment paper or wax paper.
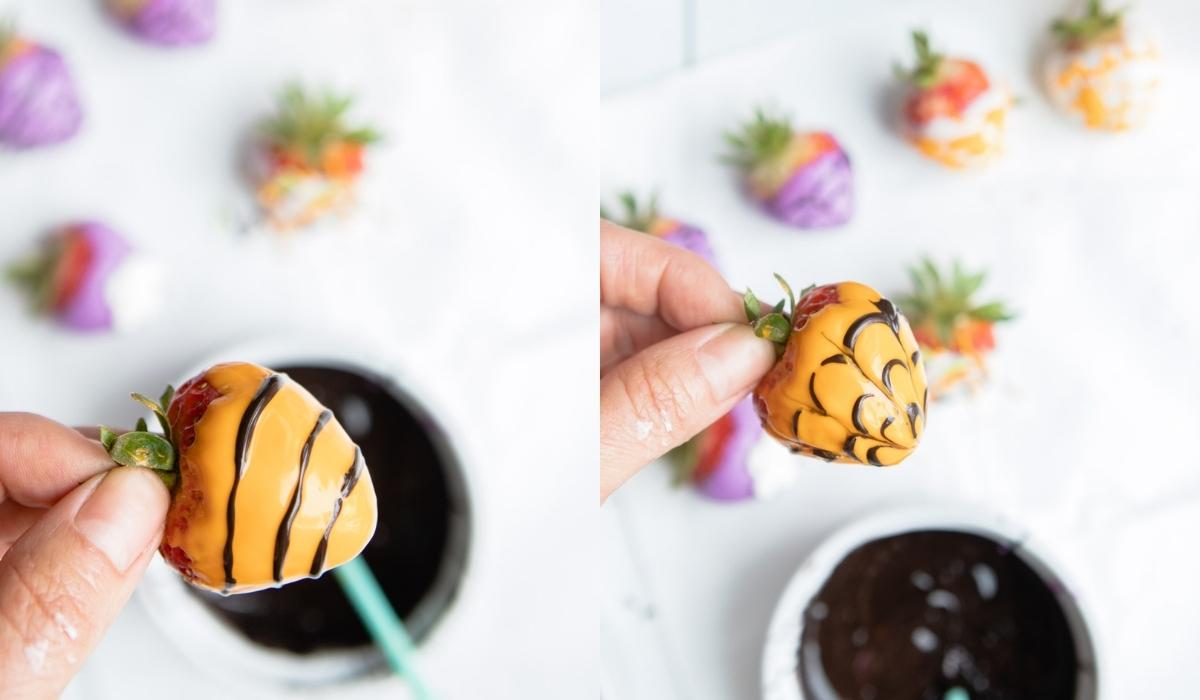
The chocolate begins to harden right away, so it’s important you work quickly to decorate the strawberry Halloween treats. If using sprinkles or candy eyes/decorations, immediately add them to the berries. See below for instructions on how to make a few of the other designs featured.
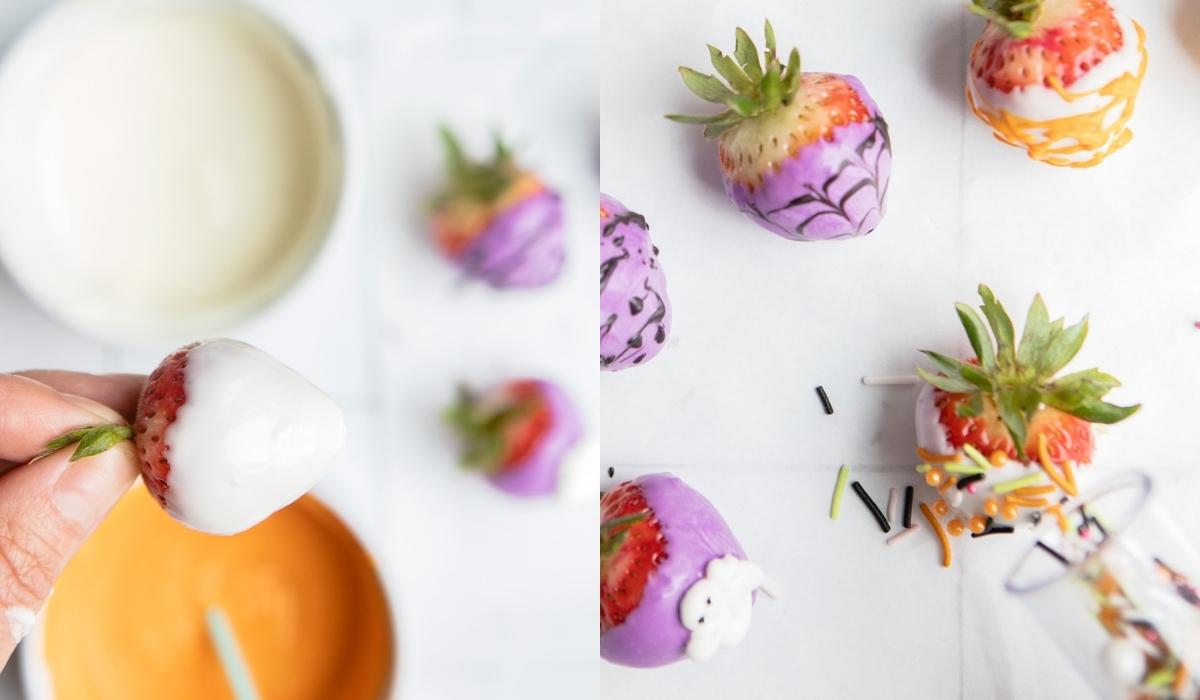
Once your strawberries are decorated to your liking, allow to set out until chocolate comes to room temperature and hardens. This should take about 15 minutes.
It is not necessary to freeze the strawberries, and may in fact mess up your results! As frozen chocolate covered strawberries thaw, the berries will release moisture and may ruin the chocolate coating.
Making candied strawberries using candy melts
I love making festive treats with candy melts, because they create a beautiful shiny and smooth candy surface. They create beautiful and yummy candy bark as seen here with my St. Patrick’s Day bark, and here with my Game Day Bark. They’re also great because you don’t have to fuss with coloring your white chocolate, and vibrant colors are often hard to achieve when coloring chocolate. Here’s how to work with them:
- The best way to melt candy melts is in the microwave. Grab a microwave-safe bowl for all the candy colors you’re melting, and toss in 1 cup of candy melts. I always like to add a bit of coconut oil to each bowl, which helps create a smoother coating. I start with 1 teaspoon per 1 cup of candy melts, and add more as needed.
- Microwave on 50% power for 45 seconds, stir, and heat again for 45-60 seconds at 50% power. If candy has not started to melt at that time, let it sit for about 1-2 minutes and stir. If the residual heat has still not melted the candy enough, or if the candy is too thick to work with, add more coconut oil or vegetable oil, and continue to heat and stir in 20-30-second increments at 50% power.
- Once desired consistency is achieved and candy is melted, proceed with dipping the strawberries.
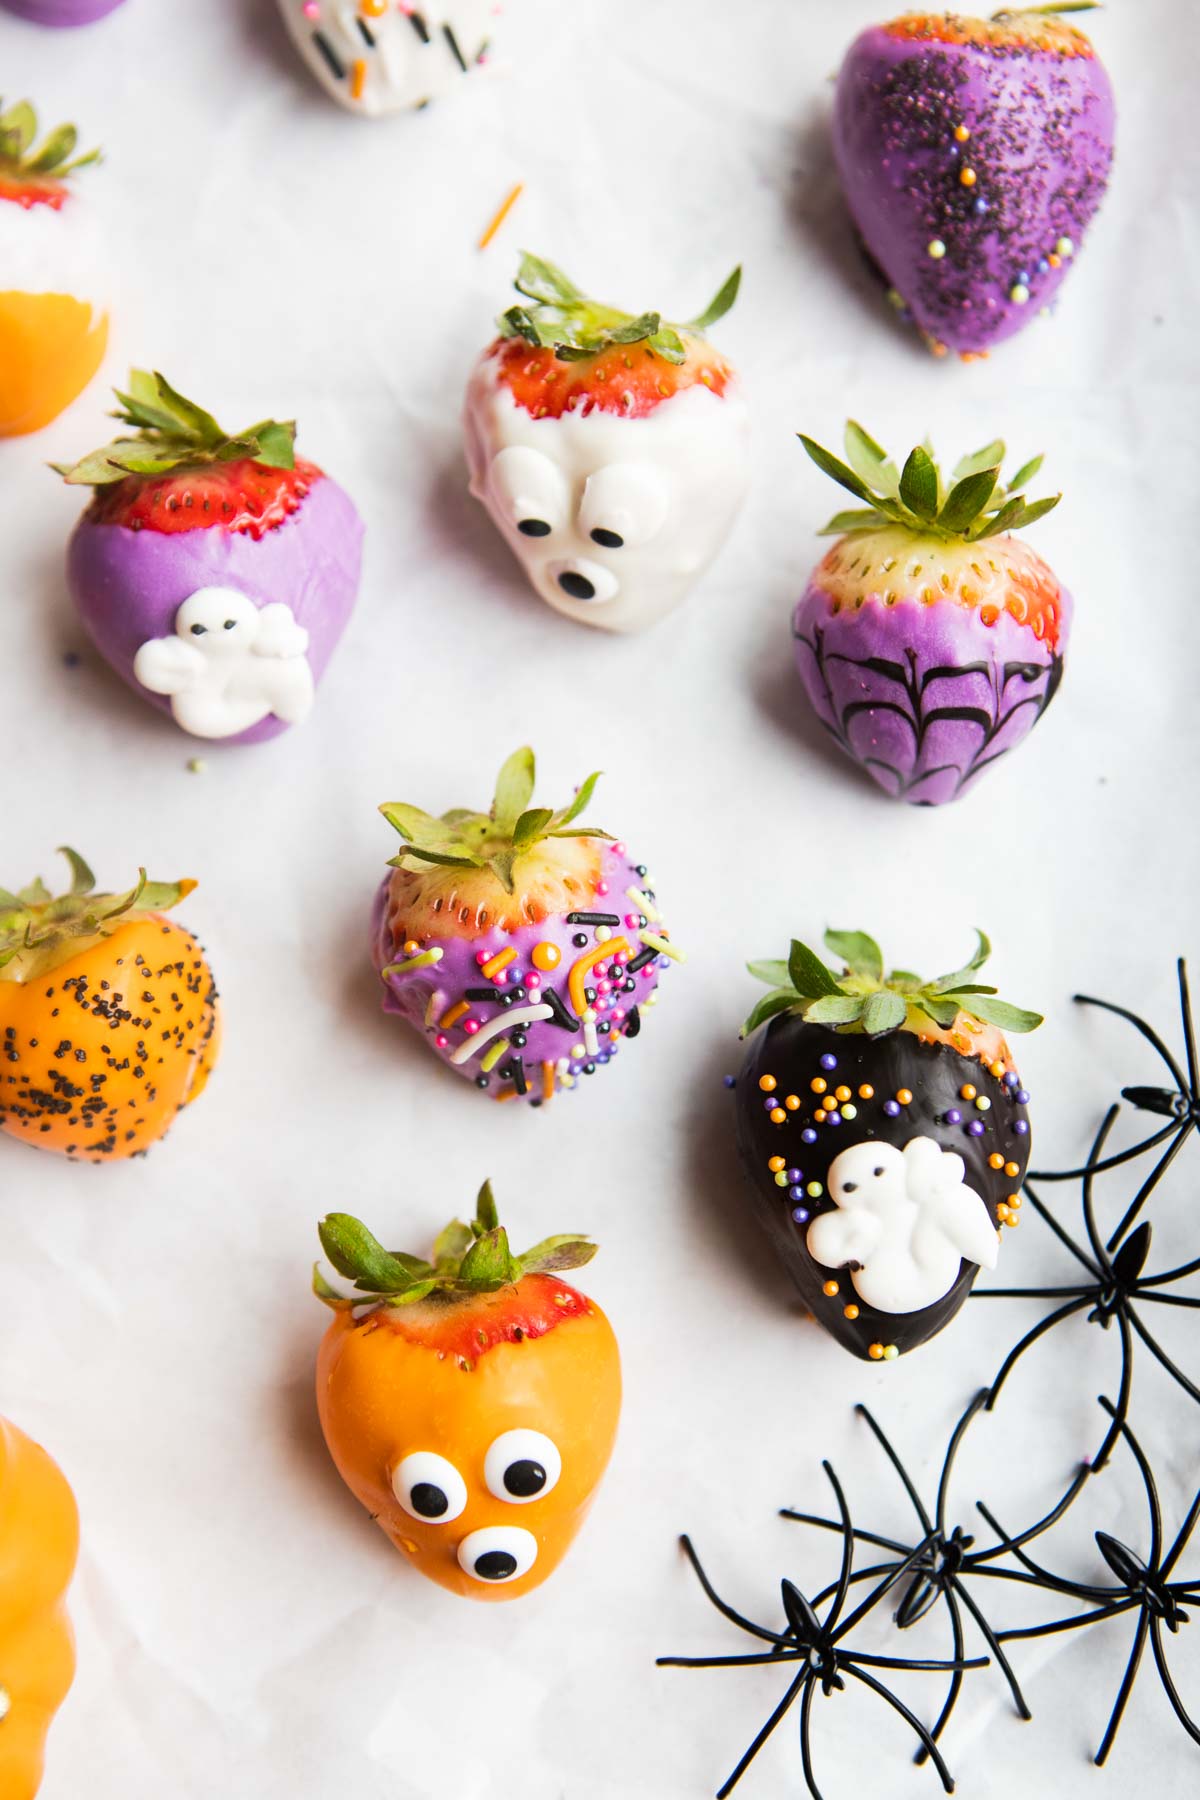
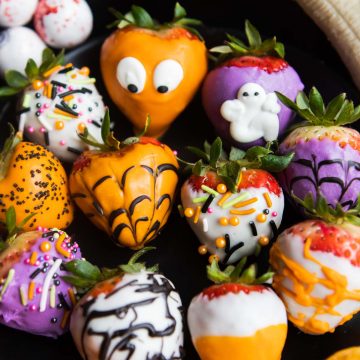
How to make different designs
- To make strawberry ghosts, simply dip the strawberry in melted white chocolate melts and pipe on the eyes and mouth with melted black candy melts, or attach candied eyes.
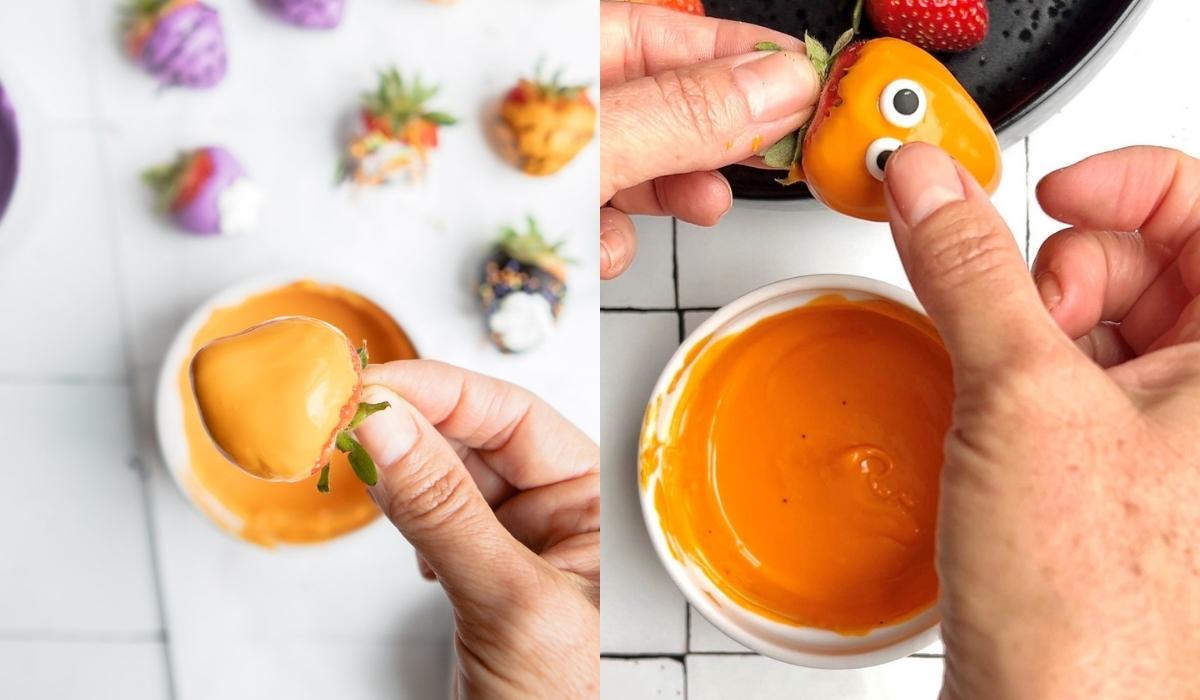
- Make pumpkin faces, dip berries in orange colored chocolate and allow to set a bit. Fill a piping bag or Ziploc bag with the top cut out with warm black chocolate and draw on simple ovals or upsidedown v for the eyes and a cute crooked smile for the mouth. You can also draw the face on my hand, but using a pastry bag will allow for better control.
- To make the little wavy lines, use the same technique as we use with these spider web Halloween sugar cookies. Dip the strawberry in chocolate. Immediately draw vertical lines in a contrast color, and drag a toothpick or scribe tool down through the line to create a wavey effect.
- Create a paint splatter effect by dipping strawberry in chocolate, then let sit for a minute. Dip a toothpick in contrast color and splatter on like a Jackson Pollock painting.
Expert Tips
- Dry strawberries very well so that the chocolate can adhere. Allow berries to come to room temperature to prevent condensation from forming.
- If using chocolate, temper it to help prevent the chocolate from looking streaky or dull after the chocolate sets. Set aside a small amount of chocolate to stir in at the end after most of the chocolate has already melted.
- If you don’t like how one of your designs turns out, simply dip the strawberry in a second round of chocolate and start all over!
- You must work quickly when using candy melts, as it sets so quickly.
- If your candy melts “seize”, which means they are hard, thick and don’t want to melt, first stop heating the candy. Candy melts won’t melt if they get overheated, so if you just let them sit for a couple of minutes, they should soften as they cool off. If they candy seems to be melting fine, they just are too thick to work with, this is where you will add more coconut or vegetable oil to thin out.
Store leftover strawberries in an airtight container in the fridge or a cool place on the counter for 1-2 days. I hope you love these happy Halloween strawberries! Give them a try for your next Halloween party or even as a special after-school snack. And check out my other Halloween recipes and ideas here!


Tried this recipe? Please leave a comment and/or rating, letting me know how you enjoyed it! Connect with me on Instagram and Pinterest, and never miss a post by signing up for my weekly newsletter!
Halloween Chocolate Covered Strawberries
Ingredients
- 2 cups Candy melts or melting chocolate chips
- 2 teaspoon Coconut oil
- 1 pint Strawberries
- various sprinkles and edible candy decorations
Instructions
- If using chocolate chips: Begin by melting your chocolate over a double boiler till nice and smooth. Add regular food coloring to melted white chocolate if creating different color variations.
- If using candy melts: Grab a microwave-safe bowl for all the candy colors you’re melting, and toss in 1 cup of candy melts. Add 1 teaspoon of coconut oil or vegetable oil per 1 cup of candy melts, and add more as needed.
- Microwave on 50% power for 45 seconds, stir, and heat again for 45-60 seconds at 50% power. If candy has not started to melt at that time, let it sit for about 1-2 minutes and stir. If the residual heat has still not melted the candy enough, or if the candy is too thick to work with, add more coconut oil or vegetable oil, and continue to heat and stir in 20-30-second increments at 50% power.
- Hold strawberry by green tops and dip in melted chocolate, slowly rotating and dipping them as close to the top of the strawberry as possible.
- Allow excess chocolate to drip off of strawberry, and immediately set on a baking tray lined with a piece of parchment paper or wax paper.
- The chocolate begins to harden right away, so it’s important you work quickly to decorate the strawberry Halloween treats. If using sprinkles or candy eyes/decorations, immediately add them to the berries.
- Once your strawberries are decorated to your liking, allow to set out until chocolate comes to room temperature and hardens. This should take about 15 minutes.
Notes
- Dry strawberries very well so that the chocolate can adhere. Allow berries to come to room temperature to prevent condensation from forming.
- If using chocolate, temper it to help prevent the chocolate from looking streaky or dull after the chocolate sets. Set aside a small amount of chocolate to stir in at the end after most of the chocolate has already melted.
- You must work quickly when using candy melts, as it sets so quickly.
- If your candy melts “seize”, which means they are hard, thick and don’t want to melt, first stop heating the candy. Candy melts won’t melt if they get overheated, so if you just let them sit for a couple of minutes, they should soften as they cool off. If they candy seems to be melting fine, they just are too thick to work with, this is where you will add more coconut or vegetable oil to thin out.

Susie says
I cannot wait to make these for Halloween. I got all the supplies (candy melts and decor) yesterday. My kids are going to go crazy for these Halloween treats!